
-Kubernetes goals
From the official website :
Kubernetes is a portable, extensible, open-source platform for managing containerized workloads and services, that facilitates both declarative configuration and automation.
The containers orchestrator provides high-level features, (mainly focused on automation) to manage applications deployment and gather them in a global plateform :
– service discovery and load balancing
– storage orchestration (storage mount of multiple storage systems : local, cloud, …)
– automated rollouts and rollbacks (automated deploy to reach a specified state and rollback that if failure)
– automatic bin packing (allocate automatically required resources according to apps requirements)
– self-healing (automatically restart/kill failed containers and advertise them to client only when that are healthy)
– secret and configuration management (store and manage sensitive information)
Kubernetes benefits
– automated processes for almost everything : service discovery, deployment, undeployment, failovers, resource allocation, load balancing.
– Reliability and speed of these automated processes.
– Open architecture. For example it uses Docker as container runtime because Docker is today the way the container runtime of Kubernetes was designed to use any other container runtime that implements the specification for that.
– complexity of processes details hidden in the cluster : we declare what we need and the Kubernetes does that
Kubernetes drawbacks
Complexity : Hiding complexity in the platform and providing automated processes is pleasant when they work. But when that is not the case, that is very different. Indeed when an issue happens (error at runtime or impossibility to achieve something), it may be (very) hard to understand the root cause because we don’t know the whole Kubernetes workflow, particularly elementary steps of these processes. Only the time and the experience on the platform mitigates that.
Kubernetes : components overview
A kubernetes cluster in summary
A Kubernetes cluster consists of a set of worker machines, called nodes, that run containerized applications.
Every cluster has at least one worker node.
The worker node(s) host the Pods that are the components of the application workload.
The control plane components manages the worker nodes and the Pods in the cluster.
In production environments, the control plane components usually run across multiple computers and a cluster usually runs multiple nodes, providing fault-tolerance and high availability.
Control Plane Components
All of these are containers.
kube-apiserver
It exposes the Kubernetes API. It is the frontend to the cluster’s shared state through which :
– kubernetes components interact.
– no-kubernetes components (applications outside or inside the clusters, scripts and so for…)interact.
etcd
Consistent and highly-available key-value store used as Kubernetes’ backing store for all cluster data.
By default the etcd client API is exposed on the port 2379, and the peer on the port 2380.
And the client urls startup properties use the eth0 ip of the host. If IP is dynamic, using a mapping in etc/hosts should be helpful.
Helpful etcd flags :
listen-peer-urls :
List of URLs to listen on for peer traffic. This flag tells the etcd to accept incoming requests from its peers on the specified scheme://IP:port combinations. Scheme can be either http or https. If 0.0.0.0 is specified as the IP, etcd listens to the given port on all interfaces. If an IP address is given as well as a port, etcd will listen on the given port and interface. Multiple URLs may be used to specify a number of addresses and ports to listen on. The etcd will respond to requests from any of the listed addresses and ports.
default: “http://localhost:2380”
env variable: ETCD_LISTEN_PEER_URLS
example: “http://10.0.0.1:2380”
invalid example: “http://example.com:2380” (domain name is invalid for binding)
kube-scheduler
It assigns/schedule Pods to Nodes.
Factors taken into account for node selection decisions include: individual and collective resource requirements, hardware/software/policy constraints, affinity and anti-affinity specifications, data locality, inter-workload interference, and deadlines.
kube-controller-manager
The Kube Controller is a control loop that watches the shared state of the cluster
through the apiserver and makes changes attempting to move the current state towards the
desired state.
In practice that is a single process/binary that represent multiple logic controllers :
– Namespace controller
– Node controller
– Replication controller
– Endpoints controller
– Service Account & Token controllers
Each logic controller tries to move the current cluster state closer to the desired state.
Node Components
These are run on each node.
kubelet (run also on a master node)
It is the primary « node agent » that runs on each node.
– It can register the node with the apiserver using one of: the hostname; a flag to override the hostname; or specific logic for a cloud provider.
– The kubelet works in terms of a PodSpec. A PodSpec is a YAML or JSON object that describes a pod. The kubelet takes a set of PodSpecs that are provided through various mechanisms (primarily through the apiserver) and ensures that the containers described in those PodSpecs are running and healthy.
kube-proxy (may also run on a master node if it is configured to run pods)
It is a container that is a network proxy implementing part of the Kubernetes Service concept (and so ports).
It maintains network rules on nodes. These network rules allow network communication to your Pods from network sessions inside or outside of your cluster.
Concretely the node that runs a pod configured with a service part exposing the pod externally (NodePort attribute filled) have a specific kube-proxy process that runs in local for each exposed port.
For example if the service exposes the application port to 30000 as external/NodePort, the node will have a kube-proxy such as :
tcp6 0 0 :::30000 :::* LISTEN 9317/kube-proxy
Container runtime
It is a software that is responsible for running containers.
Kubernetes supports several container runtimes: Docker, containerd, CRI-O, and any implementation of the Kubernetes CRI.
Kubernetes installation and configuration with packet managers
Ubuntu
1) Disable all swap :
swapoff -a
You may also need to remove entries for swap partitions in vi /etc/fstab
2) Add the Google apt repository gpg key :
curl -s https://packages.cloud.google.com/apt/doc/apt-key.gpg | sudo apt-key add -
3) Add the Kubernetes apt repository :
sudo sh -c "echo deb https://apt.kubernetes.io/ kubernetes-xenial main > /etc/apt/sources.list.d/kubernetes.list"
4) Update the package list :
sudo apt-get update
5) Browse versions available for kube* applications in the repository :
apt-cache policy kubeadm
Note that core kube application evolve with a common version.
6) Install kube* applications (at least these 3) :
sudo apt-get install -y kubelet kubeadm kubectl
7) Hold versions for these applications:
sudo apt-mark hold kubelet kubeadm kubectl
8) Enable kubelet with systemd:
sudo systemctl enable kubelet.service
9) Configure the docker deamon startup command to use systemd as cgroupdriver (default is cgroupfs)
The idea is using a single cgroup manager and not both systemd (used in most of linux distros) and cgroupfs.
To achieve that, either we edit the systemd startup config file :
systemctl edit --full docker and we make sure that ExecStart contains the systemd value for native.cgroupdriver such as :
ExecStart=/usr/bin/dockerd --exec-opt native.cgroupdriver=systemd -H fd:// --containerd=/run/containerd/containerd.sock
Or as alternative we could create/update the daemon.json file used by the docker deamon when it starts :
sudo bash -c 'cat > /etc/docker/daemon.json <<EOF { "exec-opts": ["native.cgroupdriver=systemd"], "log-driver": "json-file", "log-opts": { "max-size": "100m" }, "storage-driver": "overlay2" } EOF' |
10) Reload the systemd config and restart the docker deamon :
sudo systemctl daemon-reload
sudo systemctl restart docker
Centos
1) Disable all swap == Ubuntu way
2 and 3) Add the Google apt repository gpg key and add the Kubernetes apt repository :
cat <<EOF > /etc/yum.repos.d/kubernetes.repo [kubernetes] name=Kubernetes baseurl=https://packages.cloud.google.com/yum/repos/kubernetes-el7-x86_64 enabled=1 gpgcheck=1 repo_gpgcheck=1 gpgkey=https://packages.cloud.google.com/yum/doc/yum-key.gpg https://packages.cloud.google.com/yum/doc/rpm-package-key.gpg EOF |
4) Update the package list for non-installed applications : not required for Centos
5) Browse versions available for kube* applications in the repository :
yum list --showduplicates kubeadm
6) Install kube* applications (at least these 3) :
sudo yum install -y kubelet kubeadm kubectl
7) Hold versions for these applications:
todo….
8) Enable kubelet with systemd == Ubuntu way
9) Configure the docker deamon startup command to use systemd as cgroupdriver (default is cgroupfs) == Ubuntu way
10) Reload the systemd config and restart the docker deamon == Ubuntu way
Kubernetes reset on Master
1) Pass as sudoer or extended rights :
sudo su
2) Revert changes done to the host by ‘kubeadm init’ or ‘kubeadm join’ :
kubeadm reset -f
3) Clean up iptables.
To check that you use classic iptables, execute iptables --list (or -L).
To clean up all iptable entries :
iptables -F && iptables -t nat -F && iptables -t mangle -F && iptables -X
Kubernetes reset on nodes
1) Pass as sudoer or extended rights :
sudo su
2) Revert changes done to the host by kubeadm join :
kubeadm reset -f
Kubernetes uninstallation
We have to perform these steps on each node (master as worker).
1) Pass as sudoer or extended rights :
sudo su
2) Revert changes done to the host by ‘kubeadm init’ or ‘kubeadm join’ :
kubeadm reset -f
3) Ubuntu specific : uninstall all kube* programs and remove their dependencies (not required by others)
Because we could have multiple kube installed programs (kubectl, kubeadm, kubelet,…), that may be simpler to not need to list all of them.
Before running the remove command, we could check that we remove only desired programs with
apt list --installed 2>/dev/null | grep ^kube.*\/ cut -d'/' -f1 | xargs echo
If the list is fine, we could so perform the deletion :
apt list --installed 2>/dev/null | grep ^kube.*\/ | cut -d'/' -f1 | xargs apt-get purge -y --allow-change-held-packages
We specify --allow-change-held-packages because we generally « hold » versions of kube* programs.
At last we could remove unused dependencies :
apt-get -y autoremove
3) Centos specific : uninstall all kube* programs
Similarly to Ubuntu case, we could either list kube* program to uninstall or remove them by filtering them from yum list :
yum list installed | grep ^kube | awk '{sub(/\.x86_64/, ""); print $1}' | xargs yum -y remove
To remove dependencies not required by other programs, that is little more complicated with Centos.
The subcommand history can help : yum history outputs all changed performed with yum. Each changed performed by a yum command is associated to a transaction with an id.
So the idea is to find the transaction id that installed the kube* programs and to undo that with yum history undo ID_TRANSACTION or to rollback all transactions until a specific one yum history rollback ID_TRANSACTION_TO_COMEBACK
To identify the transaction we could display their content with : yum history info TRANSACTION_ID (or with a range FROM..TO)
4) Remove the kube home directory
sudo rm -rf ~/.kube
5) Remove any programs not installed via apt-get.
For example with Ubuntu, the kube-proxy cmdline program have to be installed with snap/
So to remove that we need to execute :
snap remove kube-proxy
Kubernetes : bootstrap a cluster on the master and make a node to join the cluster
Bootstrap the cluster on the master node
1) Choose/Download a network policy (Calico, Cilium, Kube-router, Romana, Weave Net,…)
For example for Calico, we can download that such as :
wget https://docs.projectcalico.org/manifests/calico.yaml
2) Use the network policy such as or adjust that.
By default, calico has the pool conf part in that way :
# The default IPv4 pool to create on startup if none exists. Pod IPs will be # chosen from this range. Changing this value after installation will have # no effect. This should fall within `--cluster-cidr`. # - name: CALICO_IPV4POOL_CIDR # value: "192.168.0.0/16" |
That is commented in the calico.yaml file because that is the default
The idea is to uncomment it and to replace the address range by a range that suits to our current network.
For example, if 192.168.X.X address is used by our local network but that 192.170.X.X is not, we could value that part such as :
# The default IPv4 pool to create on startup if none exists. Pod IPs will be # chosen from this range. Changing this value after installation will have # no effect. This should fall within `--cluster-cidr`. - name: CALICO_IPV4POOL_CIDR value: "192.170.0.0/16" |
3) Init the cluster :
The ip address range of pods matter when we init the cluster.
That range has to match with the range of the network policy.
For example, the default Calico range starts at 192.168.0.0/16 (that is configurable), so we specify
the CIDR (Classless Inter-Domain Routing) of the cluster with that value :
sudo kubeadm init --pod-network-cidr=192.168.0.0/16
4) Follow instructions provided by the kubeadm init command output (do it as the regular user):
mkdir -p $HOME/.kube
sudo cp /etc/kubernetes/admin.conf $HOME/.kube/config
sudo chown $(id -u):$(id -g) $HOME/.kube/config
We do that for two reasons : by default kubectl looks for kubeconfig files in ~/.kube/config and we want to use kubectl with a regular user.
5) Apply the network policy to the cluster (mandatory):
ubectl apply -f calico.yaml
Without that policy, the dns pods don’t run.
6) Add the dashboard UI resource to the cluster (optional but advised):
kubectl apply -f https://raw.githubusercontent.com/kubernetes/dashboard/v2.7.0/aio/deploy/recommended.yaml
Note :
– the yaml url changes very (too?) often
– we need to create an application gateway to the service api to access to that : kubectl proxy
– by default the dashboard is accessible from there : http://localhost:8001/api/v1/namespaces/kubernetes-dashboard/services/https:kubernetes-dashboard:/proxy/
– we need a token to access the dashboard
7) Check that node is ready :
kubectl get nodes
8) Check that all pods are running :
kubectl get --all-namespaces --watch pods
or with short args :
kubectl get pods -A -w
Make the worker node join the cluster
1) Use the token and the ca cert hash to join the cluster.
That is provided in the output of kubectl init but we could also retrieve it from the master node :
– to get the token : kubeadm token list (if expired, we can create another one : kubeadm token create)
– to get the ca cert hash :
openssl x509 -pubkey -in /etc/kubernetes/pki/ca.crt | openssl rsa -pubin -outform der 2>/dev/null | openssl dgst -sha256 -hex | sed 's/^.* //'
2) Join the cluster :
sudo kubeadm join MASTER_IP_ADDRESS:6443 \ --token TOKEN \ --discovery-token-ca-cert-hash sha256:CA_CERT_HASH |
Use kubectl on worker nodes
Kubcetl is by default configured and working on the master.
It requires a kube-apiserver pod and ~/.kube/config.
For worker nodes, we don’t need to use kube-apiserver. What we want is using the master configuration to pass by it.
To achieve it we have to copy the ~/.kube/config file from the master to the ~/.kube/config on the worker where ~ is the user executing kubcetl on the worker.
The dockershim problematic
The dockershim component of Kubernetes allows the use of Docker as a Kubernetes container runtime.
Kubernetes’ built-in dockershim has been removed as of version v1.24.
Here’s how you can determine if you depend on Docker:
– Privileged pod that executes Docker commands (such as docker ps), restarts the Docker service (commands such as systemctl restart docker), or modifies
Docker-specific files such as /etc/docker/daemon.json.
– Private registry or image mirror settings in the Docker configuration file (such as /etc/docker/daemon.json).
– Scripts and applications running on nodes outside of your Kubernetes infrastructure execute Docker commands (SSH to nodes, node startup scripts, directly installed agents).
– Third-party tools that perform the privileged operations mentioned above.
How to do if you cannot update your application and scripts to be compliant with the dockershim removal
Use cri-dockerd: This adapter provides a shim for Docker Engine that lets you control Docker via the Kubernetes Container Runtime Interface.
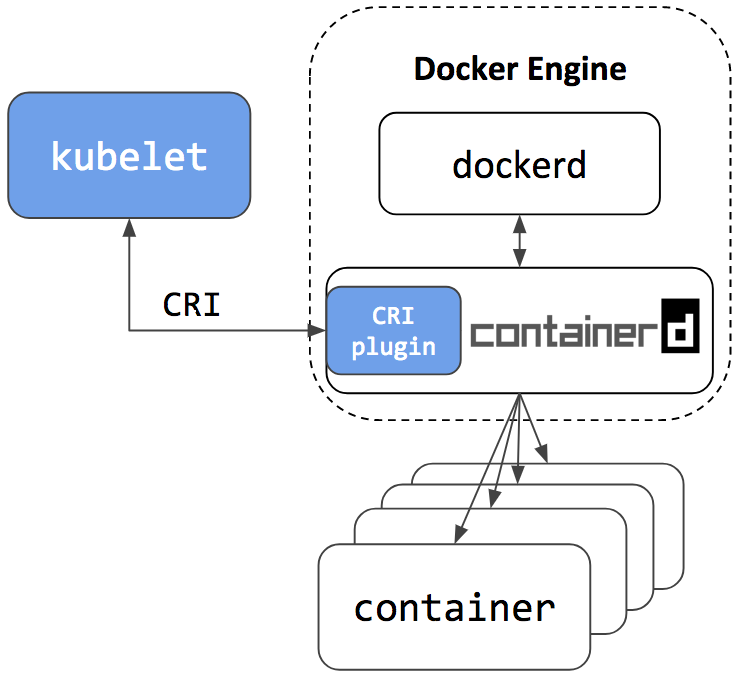
Docker Engine remains usable with Docker aside Kubernetes :
Docker Engine is built on top of containerd. Docker Community Edition uses now containerd version 1.1+.
So it will have the CRI plugin built-in and enabled by default. This means users will have the option to continue using Docker Engine for other purposes typical for Docker users, while also being able to configure Kubernetes to use the underlying containerd that came on the same node.
See the architecture figure below showing the same containerd being used by Docker Engine and Kubelet:
Kubectl completion
– Require the bash-completion package.
– add that line in the .bashrc of the user :
source <(kubectl completion bash) |
Kubectl bash
Allow to add to the PS1 shell the current context and cluster used.
– Require to dl/generate the kube-ps1.sh (https://github.com/jonmosco/kube-ps1)
– add these lines in the .bashrc of the user :
source ~/.kube-ps1.sh PS1='[\u@\h \W $(kube_ps1)]\$ ' |
Kubectl env variable
KUBECONFIG : specify the kubectl config(s) location.
May make sense to export it in .bashrc.
Kubernetes dns
Kubernetes relies on a dns service (kube-dns, the older and now core-dns) to allow containers to use the DNS Service’s IP to resolve DNS names.