
Go back to the table of contents for
Developing a Contact Management Application with Angular 1.5X and Java
We will enrich the Angular application to define views of the application and we will also add a menu bar to access them.
For the time being, the views will be simple skeletons without real content.
As previously discussed, we work iteratively. We don’t try to handle all concerns in the same time. As a important thing works, we tackle another thing.
We use UI-Router for Angular 1 to handle the navigation logic in the client side.
UI-Router is the defacto standard for routing in AngularJS. Influenced by the core angular router $route and the Ember Router, UI-Router has become the standard choice for routing non-trivial apps in Angular 1. The UI-Router package is distributed using npm, the node package manager.
npm install --save angular-ui-routerWe use Bootstrap to make the appearance of the menu good looking.
Here is the list of tasks we will perform :
- Defining the states of the application during the bootstrap of the angular application
- Creating the minimal view components associated to each state
- Creating the menu bar to navigate between the views
- Running the application
- Downloading the source code
Defining the states of the application during the bootstrap of the angular application
UI-Router v1.0 for Angular 1.x we are using has introduced the ability to route directly to Angular 1.5+ components. Although UI-Router has always allowed views to be defined as arbitrary template and controller combinations, it is highly recommend that the Angular 1.5 component model is adopted instead. It is a good thing since it is what we will do.
Here is the new version of app.js (the resource which bootstraps the Angular application) which now uses the UI-Router module with the component flavor :
(function() { 'use strict'; //IIFE angular.module('myContactApp',['ui.router']) .config(function($stateProvider, $urlRouterProvider, $locationProvider) { var states = [ { name: 'manageContacts', url: '/manageContacts', component: 'contactsManagementView' }, { name: 'createContacts', url: '/createContacts', component: 'contactCreationView' } ]; states.forEach(function(state) { $stateProvider.state(state); }); $urlRouterProvider.otherwise('/manageContacts'); }) // END IIFE })(); |
In this new version of app.js, we introduce new interesting things. We will provide some explanations about them.
How to make the myContactApp module depending on the ui.router module ?
Like that :
angular.module('myContactApp',['ui.router'])
The module function takes two arguments : as first argument the name of the module we instantiate and as second argument an array of String which list the modules myContactApp depends on.
In the previous task, we specified an empty array as the second argument of the module() function as our angular application was a empty shell.
As now we want to handle the views routing, the application module needs to depend on a module which provides this service.
So, we fill this array with one element : the module name of the ui.router module that is 'ui.router'.
Where and how to define the navigation rules of the application ?
The config() function of the Module object is the suitable place to do it. From the official AngularJS documentation, a module is a collection of configuration and run blocks which get applied to the application during the bootstrap process. In its simplest form the module consists of a collection of two kinds of blocks: configuration blocks and run blocks. When you call the config() function on a Module object, you declare a configuration block. It is executed during the provider registrations and configuration phase. Only providers and constants can be injected into configuration blocks. This is to prevent accidental instantiation of services before they have been fully configured. In our case, we invoke the config() function to initialize the states and the rules of navigation in the application. To achieve this task we inject in the config() function two providers coming from the ui-router module : $stateProvider and $urlRouterProvider.
What are these ui-router providers we use to initialize the states of the application ?
– The $stateProvider works similar to Angular’s v1 router, but it focuses purely on state. The $stateProvider provides mainly a way to declare the states for your application.
– The $urlRouterProvider has the responsibility of watching $location. When $location changes it runs through a list of rules one by one until a match is found. $urlRouterProvider is used behind the scenes anytime you specify a url in a state configuration. All urls are compiled into a UrlMatcher object. There are several methods on $urlRouterProvider that make it useful to use directly in your module config.
What is a state and how to add them in the application?
A state corresponds to a « place » in the application in terms of the overall UI and navigation. You can consider it as a place which is defined by a set of core things, mainly the name, the URL and the component of the state.
Below we create JavaScript objects with the three core properties to define a state with UI-Router :
var states = [ { name: 'manageContacts', url: '/manageContacts', component: 'contactsManagementView' }, { name: 'createContacts', url: '/createContacts', component: 'contactCreationView' } ]; |
So far, these are simple objects grouped in a array but not connected yet with the states handling of the application.
The following code :
states.forEach(function(state) { $stateProvider.state(state); }); |
allows to add these objects as states of the application. In order to visually group the creation of state objects, l like to define them in a array and then to iterate on this array to add these states to the application (feature provided by the $stateProvider.state() function). I find this way more readable and less error prone than repeating these operations sequentially for each state: declaring a variable (or reusing the same variable), instantiating it and adding it to the application.
Can you give more detail about a state ? What represent the name, url and component properties of a state ?
– A state must have a name. This name have to be unique, e.g. « contacts », « manageContacts ». To create a parent/child state use a dot, e.g. « contacts.search », « contacts.edit ».
– Using UI-Router with the Angular components flavor without declaring a component property in the state makes no sense. So obviously we define it. The component property refers to an Angular component (1.5+ Angular). An Angular component includes both the view and the controller associated to. We will go further about them when we will write our components at the end of this task.
– It is not a mandatory property but it is a good practice to have a URL associated with the state. It allows to setup a bidirectional binding between the state and the visible URL in the browser. In this way, when a user requests a particular URL from its browser, if in the angular module the URL is related to a known state, the user is routed to this state. In a similar way, when a user navigates between the states of the applications through buttons, links and any possibilities provided by the user interface, the current URL of the browser changes to represent the actual state.
All these brings multiples advantages. It allows for example to bookmark an URL which represents a state, to transmit parameters to the state or even to link in a abstract way a state with URL. This last possibility is very interesting. Suppose you want to change the URL of a existing state which is referenced by dozen and dozen pages ? It is not a problem, you have just need to change the URL in the state declaration.
How to handle a navigation query when the submitted URL doesn’t match with any state ?
$urlRouterProvider.otherwise('/manageContacts'); |
By writing this code at the end of the config function we define the /manageContacts URL as the default URL if the submitted URL is empty or doesn’t match with any defined state.
This setting allows that the two following submitted URL route to the manageContacts state (http://localhost:8095/contact-webapp/#/manageContacts) :
– http://localhost:8095/contact-webapp
– http://localhost:8095/contact-webapp/#/urlWithNoMatch
The states of the application were defined but the components we declare in each state doesn’t exit yet. We will create them now.
Creating the minimal view components associated to each state
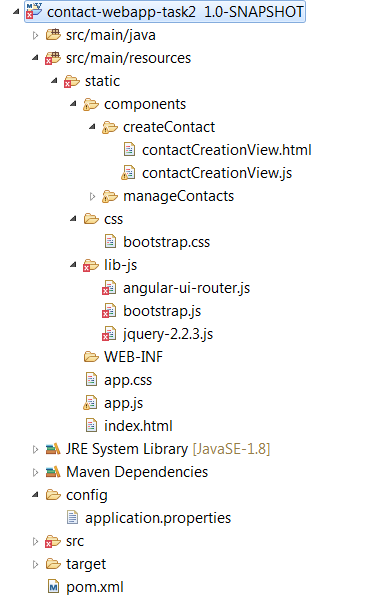
Below you can see where we will locate the components (view and controller) in the source code. The idea is simple : we have a components directory. Inside it, each page of the application has its own folder : createContact and manageContacts. Each one of these folder have two minimal files to represent a component: the html template and the controller.
For example for the contact creation page, we have contactCreationView.html and contactCreationView.js.
We suffix both files with View to distinguish the components which represent the entire view displayed on the browser page from lower level components that makes part of the view but which are only a part of that.
We will better understand this distinction in the next parts when we will implement use cases.
We will illustrate explanation and discussion about components declaration with the contactCreationView component. But it stays valid for the two other components.
contactCreationView.html
<div class="row"> <h2 class="text-center">{{$ctrl.msg}}</h2> </div> |
So far we had declared a single html file : index.html. This last one presented a important part concerning the JavaScript and CSS dependencies of the application.
A typical Angular application with Component flavor consists of a index.html file that is the root of the application and other html files associated to Component we displayed. Finally, all components displayed are child nodes of the index.html. High level components (views) that we are introducing are direct/immediate child nodes and more lower level components are indirect child nodes.
The contactCreationView.html file is very simple : it displays the value of the msg property, a property of the controller associated to the component. You can notice that the used syntax is not the same that which one used in the part 1.
Remember, we have declared the controller like that in the part 1 :
<body> <h2 class="text-center" ng-controller="myCtrl as ctrl">{{ctrl.msg}}</h2> </body> |
In fact, the two way rely on the controller but by declaring a component we don’t need any longer to declare explicitly the controller in the template with the syntax :
ng-controller="myCtrl as ctrl"
We could indeed directly reference the controller by using the $ctrl variable which refers to the controller instance of the component.
So, in the template, msg stands for simply a controller property .
From the JavaScript side, a component with a minimal usefulness has to declare at least two things : the controller (the controller of the MVC) and the template we have just seen(the view of the MVC).
Concretely, components can be registered using the component() function of an angular module, returned by angular.module(). The method takes two arguments:
– the name of the Component (as a string).
– the config object. You can note that unlike the directive() function, this function does not take a factory function.
In contactCreationView.js, we declare the component with the contactCreationView name and we define two properties of the config object : templateUrl, a string that represents the path of the html template and controller, a function representing the controller associated to the component.
Beware, in the html template, the $ctrl variable refers the controller of the component only if in the controller function you have explicitly declared a ctrl variable and you have assigned the context of the controller function to the variable. That’s why in the ContactCreationViewController() function, we write as first instruction : var ctrl = this;
You can also notice that the templateUrl value ends with the actual timestamp as query parameter. This hack allows to have always the template html updated. It is not a perfect solution as it doesn’t use the cache to retrieve the template both development (which is desirable) but also in production (which is less desirable for performance)
contactCreationView.js
(function() { 'use strict'; //IIFE function ContactCreationViewController() { var ctrl = this; ctrl.msg = "Create contact view"; } angular.module('myContactApp').component('contactCreationView', { templateUrl: 'components/createContact/contactCreationView.html?' + new Date(), controller: ContactCreationViewController }); //END IIFE })(); |
Here is the other high-level component : contactsManagementView.
As contactCreationView, it has its own controller and its own template.
contactsManagementView.html
<div class="row"> <h2 class="text-center">{{$ctrl.msg}}</h2> </div> |
(function() {
'use strict';
//IIFE


function ContactsManagementViewController() {
	var ctrl = this;
	ctrl.msg = "Manage contacts view";
}

angular.module('myContactApp').component('contactsManagementView', {
	  templateUrl: 'components/manageContacts/contactsManagementView.html?' + new Date(),
	  controller: ContactsManagementViewController
	});


//END IIFE
})(); |
Our 2 views are now accessible for clients of the application
To display them :
– http://localhost:8095/contact-webapp to be routed to the default state (manageContacts).
– http://localhost:8095/contact-webapp/#createContacts to be routed to createContact state.
– http://localhost:8095/contact-webapp/#manageContacts to be routed to manageContacts state.
You can notice in the URL the # character before the state name.
In fact, we can remove this by using the html5 mode that is enabled with Angular Js but not enabled by default.
The problem of enabling it is that it requires server configuration changes to enable page refreshing and bookmarking. You can read a discussion about it in angular ui-router issues : https://github.com/angular-ui/ui-router/issues/372.
So, stay simple for this course : keep the sharps.
Being able to display the state/view by specifying their url in the location bar of the browser is a first successful step. Nevertheless, it is obvious that it is not enough since a application should provide a menu which allows the users to select the state/view that they want to display. It is the next point.
Creating the menu bar to select the view/state to display
We will create a side-menu presenting links for each view/state available in the application. The menu should display the links in a vertical way : from top to down.
To achieve it, we will use Bootstrap(CSS and JS) to provide without effort a good visual appearance to the menu bar and we will map the html menu links to the states we have defined.
Bootstrap provides Togglable tabs. They allow to add quick, dynamic tab functionality to transition through panes of local content, even via dropdown menus.
For our need, we don’t need a dropdown display. So, we will present directly the list of links.
Besides, you can activate a tab or pill navigation without writing any JavaScript code but simply by specifying the data-toggle="tab" or data-toggle="pill" attribute on an element.
The pill value displays the links without border and the table value displays the links with borders. In our case, I propose you to use the pill format.
Rather than specifying data-toggle in each li declaration we can do simpler by adding the nav and nav-pills classes to the ul declaration. That will apply the Bootstrap pill styling for all li elements.
At last, the links may be displayed vertically or horizontally. As we want to display them vertically, we also specify the nav-stacked class in the ul declaration.
Here is the Bootstrap html code to display our menu :
<ul class="nav nav-pills nav-stacked"> <li><a>Manage existing contacts</a></li> <li><a>Create a new contact</a></li> </ul> |
As you can see, it is very simple to write a static menu with Bootstrap.
We will now define the dynamic part, that is binding the html link elements to the Angular states/views.
Here again, it is very simple since UI-routers provides two directives to perform the bindings we need. We have two bindings :
– ui-sref to bind the html link to the angular state
– ui-sref-active to highlight the selected state.
ui-sref binds a link (<a> tag) to a state. If the state has an associated URL, the directive will automatically generate and update the href attribute via the $state.href() method.
So, we add the ui-sref attribute in each <a> declaration of the menu and we fill them with the matching state name.
ui-sref-active works alongside ui-sref to add classes to an element when the related ui-sref directive’s state is active, and removing them when it is inactive.
The primary use-case is to simplify the special appearance of navigation menus relying on ui-sref, by having the « active » state’s menu button appear different, distinguishing it from the inactive menu items.
As bootstrap provides a active class to represent a active link, we use it of course.
Here is the functional html menu :
<ul class="nav nav-pills nav-stacked"> <li ui-sref-active="active"><a ui-sref="manageContacts">Manage existing contacts</a></li> <li ui-sref-active="active"><a ui-sref="createContacts">Create a new contact</a></li> </ul> |
We have almost done. The last thing to do is defining how the menu will be included in the index.html page and where and how we will display the view of the current state.
To display the view associated to the current state, UI-router provides the
ui-view directive.
The layout definition of the index.html file will be eased by using the Bootstrap grid system.
The grid system includes a responsive, mobile first fluid grid system that appropriately scales up to 12 columns as the device or viewport size increases. It includes predefined classes for easy layout options, as well as powerful mixins for generating more semantic layouts.
Rows must be placed within a .container (fixed-width) or .container-fluid (full-width) for proper alignment and padding.
We will use the container-fluid and the default 12 columns grid. Inside it, we define a single row and fill 2 data inside it. The first one is the menu bar that we span on 2 columns and the second one is the content of the view associate to the state that we span on 10 columns.
You can notice that I added border1PxWithNoPadding, a custom css class in the div which contains the menu.
With Bootstrap, one of goals is also reducing the number of custom css classes but when something seems missing, nothing prevents us from creating our own css classes.
You can find its definition in app.css :
.border1PxWithNoPadding {
	border:1px solid black; padding: 0px;
}
Here is the updated index.html page.
index.html
<!DOCTYPE html> <html ng-app="myContactApp"> <head> <title>Contacts and Groups Management (Angular JS)</title> <style> </style> <!-- JQUERY --> <script src="lib-js/jquery-2.2.3.js"></script> <!-- bootstrap JS v3.3.6 --> <script src="lib-js/bootstrap.js"></script> <!-- bootstrap CSS v3.3.6 > --> <link rel="stylesheet" type="text/css" href="css/bootstrap.css"> <!-- angular lib --> <script src="https://ajax.googleapis.com/ajax/libs/angularjs/1.5.5/angular.js"></script> <script src="https://ajax.googleapis.com/ajax/libs/angularjs/1.5.5/angular-messages.js"></script> <script src="https://ajax.googleapis.com/ajax/libs/angularjs/1.5.5/angular-mocks.js"></script> <!-- angular extension lib --> <script src="lib-js/angular-ui-router.js"></script> <!-- app --> <link rel="stylesheet" type="text/css" href="app.css"> <script src="app.js"></script> <!-- contact management components --> <script src="components/manageContacts/contactsManagementView.js"></script> <!-- contact creation components --> <script src="components/createContact/contactCreationView.js"></script> </head> <body> <div class="container-fluid"> <div class="row"> <div class="col-md-2 border1PxWithNoPadding"> <ul class="nav nav-pills nav-stacked"> <li ui-sref-active="active"><a ui-sref="manageContacts">Manage existing contacts</a></li> <li ui-sref-active="active"><a ui-sref="createContacts">Create a new contact</a></li> </ul> </div> <div class="col-md-10"> <ui-view></ui-view> </div> </div> </div> </body> </html> |
Running the application
From the command line, under the contact-webapp directory, execute the
mvn -Pdev command.
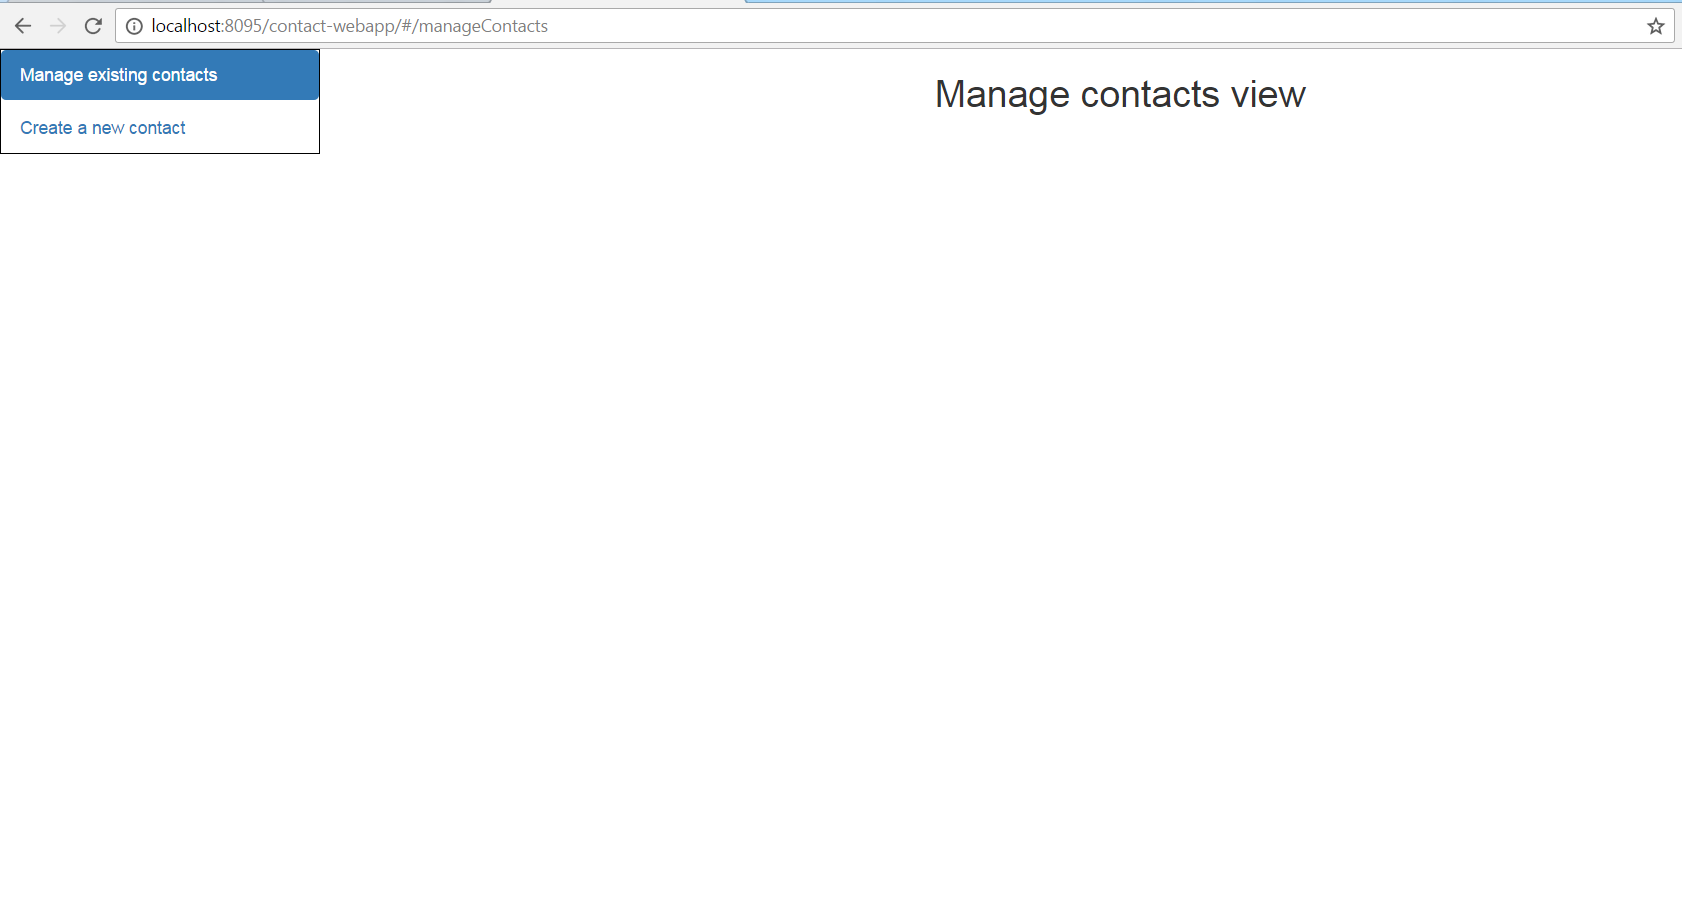
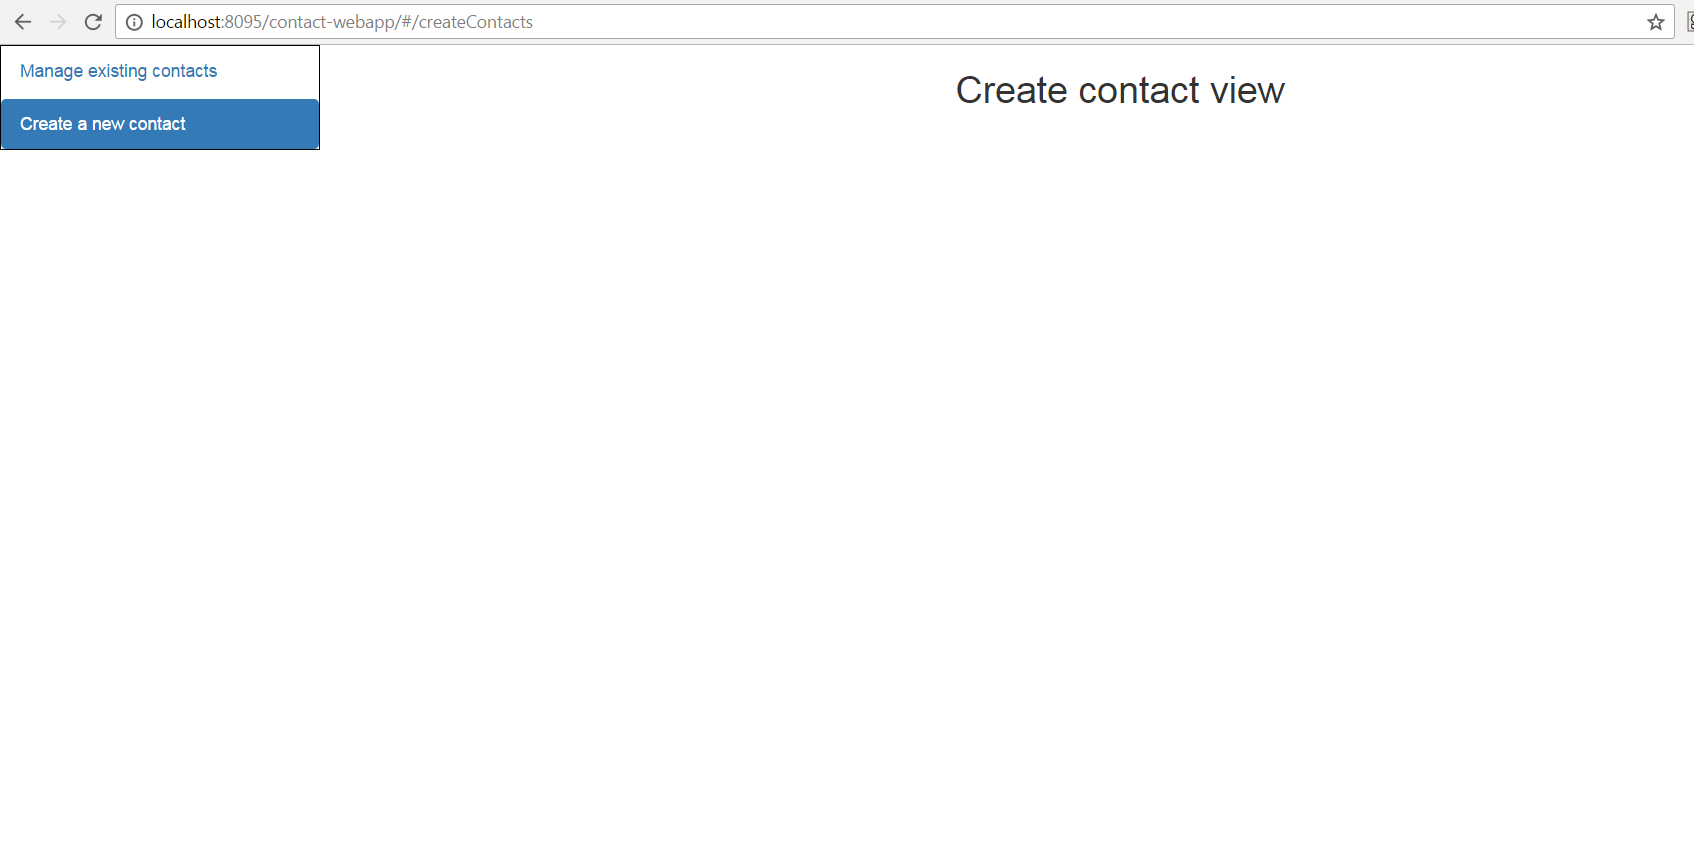
We can visit the home page from here : http://localhost:8095/contact-webapp/
Below are the displayed views matching to each defined state.
Manage contacts :
Create contact :
Downloading the source code
You can download the source code here : [sdm_download id= »2322″ fancy= »1″]