
Go back to the table of contents for
Developing a Contact Management Application with Angular 1.5X and Java
Until the end of the current iteration, the course is focused on the client-side development of the 3 use cases of the application : creating a contact, displaying contacts and modifying (updating or deleting) a contact.
We will start to implement the backend part only in the next iteration of the course.
In the meantime, we will use the http mocking facility we have configured in the previous part in order to be totally isolating from the backend.
Here are the tasks to implement the contact creation use case from the client side :
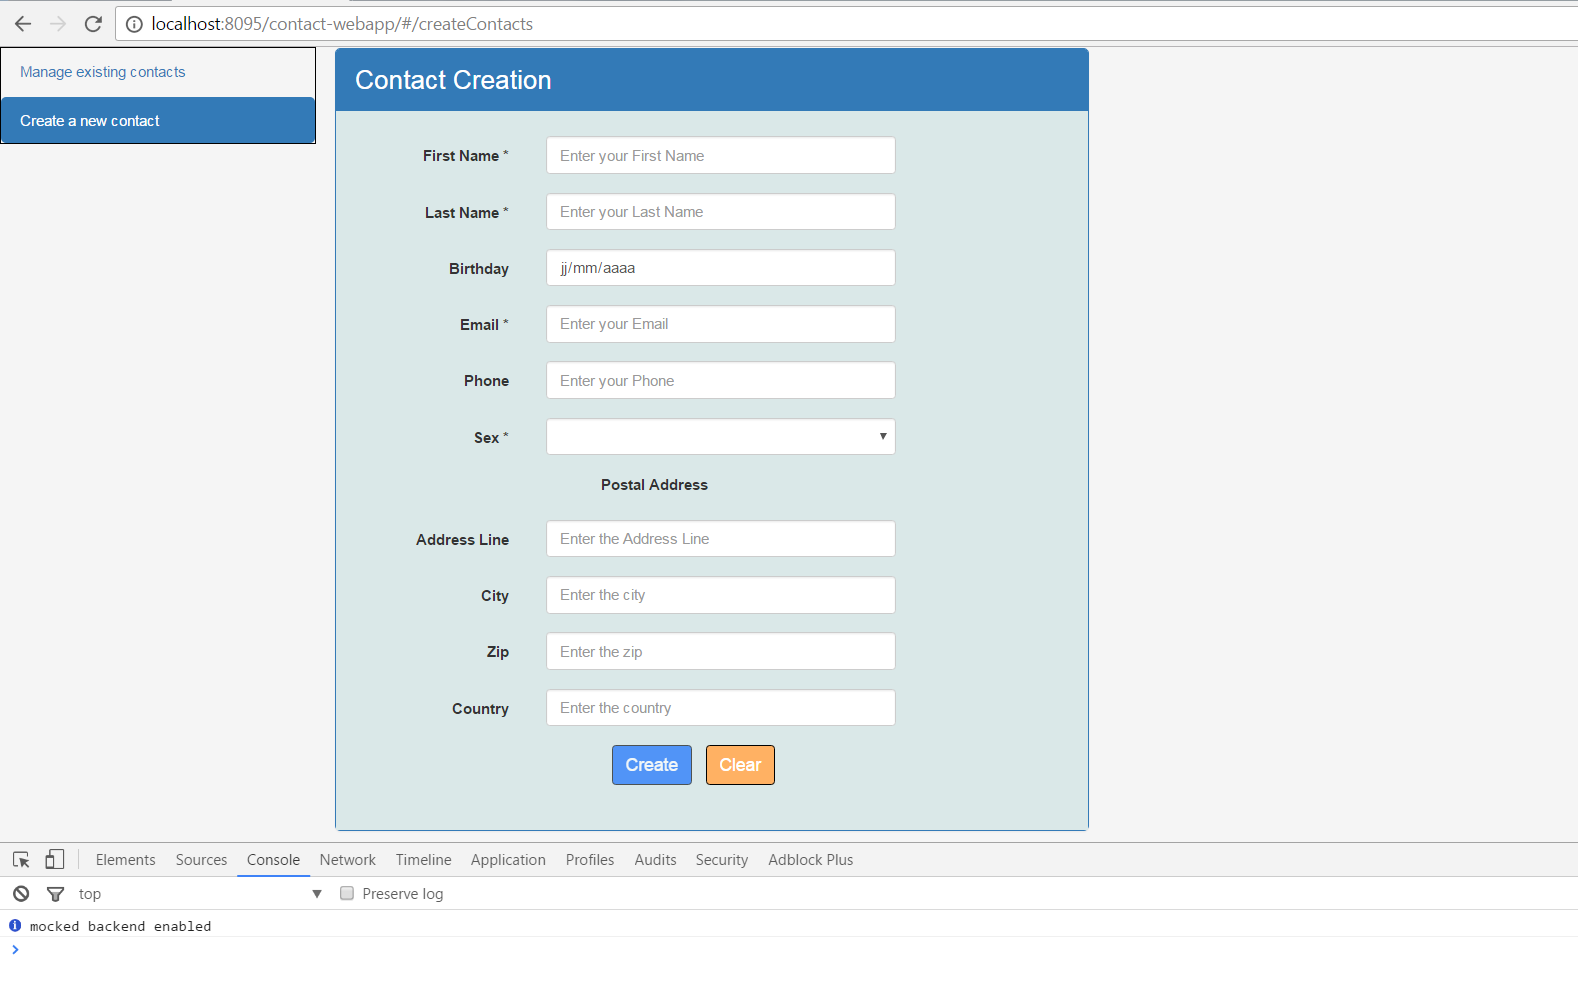
- Preview of the content that we want to get
- Source code layout
- Defining the contact model
- Creating the contactCreation component
- Creating the contactService service to request the backend
- Updating the view parent component (contactCreationView) to add the child component (contactCreation)
- Mocking the POST HTTP request that creates a contact
- Updating app.js and index.html with new required dependencies and new created resources
- Running the application
- Downloading the source code
Preview of the content that we want to get
Source code layout
To get a general view of the source code we have to get at the end of this step you can refer to the following image :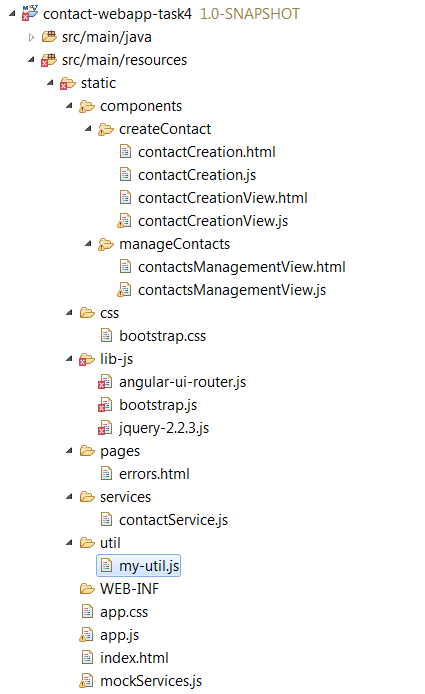
Defining the contact model
To implement the contact creation, first we need to define what a contact is as part of the application.
A contact is defined by a set a properties attached to :
– identifier (technical information)
– first name
– last name
– birthday
– sex (enumerated information)
– address (composed information)
– email address
– phone number
We suppose that no one of functional properties allows to distinguish in a unique way a contact from another one because each one of these properties may be used by multiple contacts.
For example, an email address or a phone number may be shared between two contacts.
Besides, from the server side, as all these data may change through the time, it is preferable to introduce a unique identifier for each created contact.
Whereas the presence of the identifier property. In the client side, all information of a contact are represented by String values but identifier that is a number, birthday a date and address a custom object containing properties with String values.
Here is a sample contact represented in a JavaScript object :
var contact = { id: 1, firstName: 'John', lastName: 'Doe', birthday: new Date(2013,13,1), sex: 'MALE', address: { addressLine: 'no street', city: 'forest', zip: '00000', country: 'No known yet', }, email: 'johndoe@secure.com', phone : '0612345678' }; |
Now, we will implement the components required for the use case.
When you develop a component representing a view (it is the view that we put in the ui-view directive), it is not uncommon to have a view composed of multiple components. These child components may of course contain other components.
In the contact creation use case we have 2 own components :
– contactCreationView : the view component that contains for now one child component and that is has for responsibility to handle applicative needs not specific to a particular use case such as notifying the user with some information or communication between its child components.
– contactCreation : the component containing the logic and the view to create a contact.
The 2 components have the following relationship :
contactCreationView contains contactCreation.
You have no obligation to have a child applicative component in each view component. According to the complexity of the use cases and the chosen design model you could have or not a aggregator component.
For example, you could have a view component that contains all the logic and the graphical content needed for the contact creation use case.
It is primarily a question of opinion.
Personally, I favor a model where I separate the view component of the content components because :
– it homogenizes the view components
– it allows to not pollute content components by letting applicative needs that are not specific to a particular use case to be handled by a higher level component.
– it promotes the child components reusing by not creating coupling between them and by letting the parent view be a mediator that handles the communication between them.
Creating the contactCreation component
As previously explained an angular component has always two sides : the controller and the template.
Here is the contactCreation.html template :
<div class="panel panel-primary"> <!-- heading --> <div class="panel-heading"> <span class="lead">Contact Creation</span> </div> <!-- body --> <div class="panel-body my-panel-body"> <form name="myForm" class="form-horizontal"> <div class="form-group col-md-12"> <label class="col-md-3 control-label">First Name *</label> <div class="col-md-7"> <input type="text" autocomplete="on" ng-model="$ctrl.contact.firstName" name="firstName" placeholder="Enter your First Name" required ng-minlength="2" class="form-control input-sm" /> <div class="has-error" ng-show="myForm.firstName.$dirty" ng-messages="myForm.firstName.$error"> <div ng-messages-include="pages/errors.html"></div> </div> </div> </div> <div class="form-group col-md-12"> <label class="col-md-3 control-label">Last Name *</label> <div class="col-md-7"> <input type="text" autocomplete="on" ng-model="$ctrl.contact.lastName" name="lastName" class="form-control input-sm" placeholder="Enter your Last Name" required ng-minlength="2" /> <div class="has-error" ng-show="myForm.lastName.$dirty" ng-messages="myForm.lastName.$error" role="alert"> <div ng-messages-include="pages/errors.html"></div> </div> </div> </div> <div class="form-group col-md-12"> <label class="col-md-3 control-label">Birthday</label> <div class="col-md-7"> <input type="date" autocomplete="on" ng-model="$ctrl.contact.birthday" name="birthday" class="form-control input-sm" placeholder="Enter your Birthday" /> <div class="has-error" ng-show="myForm.birthday.$dirty" ng-messages="myForm.birthday.$error" role="alert"> <div ng-messages-include="pages/errors.html"></div> </div> </div> </div> <div class="form-group col-md-12"> <label class="col-md-3 control-label">Email *</label> <div class="col-md-7"> <input type="email" autocomplete="on" ng-model="$ctrl.contact.email" name="email" class="form-control input-sm" placeholder="Enter your Email" required /> <div class="has-error" ng-show="myForm.email.$dirty" ng-messages="myForm.email.$error" role="alert"> <div ng-messages-include="pages/errors.html"></div> </div> </div> </div> <div class="form-group col-md-12"> <label class="col-md-3 control-label">Phone</label> <div class="col-md-7"> <input type="text" autocomplete="on" ng-model="$ctrl.contact.phone" name="phone" class="form-control input-sm" placeholder="Enter your Phone" ng-minlength="8" /> <div class="has-error" ng-show="myForm.phone.$dirty" ng-messages="myForm.phone.$error" role="alert"> <div ng-messages-include="pages/errors.html"></div> </div> </div> </div> <div class="form-group col-md-12"> <label class="col-md-3 control-label">Sex *</label> <div class="col-md-7"> <select id="sex " ng-model="$ctrl.contact.sex " name="sex " class="form-control input-sm " required> <option ng-repeat="option in $ctrl.sexes " value="{{option.value}} ">{{option.value}}</option> </select> <div class="has-error" ng-show="myForm.sex.$dirty " ng-messages="myForm.sex.$error " role="alert "> <div ng-messages-include="pages/errors.html "></div> </div> </div> </div> <div class="form-group col-md-12 "> <div class="col-md-4 "></div> <label class="col-md-3 ">Postal Address</label> </div> <div class="form-group col-md-12 "> <label class="col-md-3 control-label ">Address Line</label> <div class="col-md-7 "> <input type="text " autocomplete="on " name="addressLine " ng-model="$ctrl.contact.address.addressLine " class=" form-control input-sm " placeholder="Enter the Address Line " ng-minlength="2 " /> <div class="has-error" ng-show="myForm.addressLine.$dirty " ng-messages="myForm.addressLine.$error " role="alert "> <div ng-messages-include="pages/errors.html "></div> </div> </div> </div> <div class="form-group col-md-12 "> <label class="col-md-3 control-label ">City</label> <div class="col-md-7 "> <input type="text " autocomplete="on " name="city " ng-model="$ctrl.contact.address.city " class="form-control input-sm " placeholder="Enter the city " ng-minlength="2 " /> <div class="has-error" ng-show="myForm.city.$dirty " ng-messages="myForm.city.$error " role="alert "> <div ng-messages-include="pages/errors.html "></div> </div> </div> </div> <div class="form-group col-md-12 "> <label class="col-md-3 control-label ">Zip</label> <div class="col-md-7 "> <input type="text " autocomplete="on " name="zip " ng-model="$ctrl.contact.address.zip " class="form-control input-sm " placeholder="Enter the zip " ng-minlength="3 " /> <div class="has-error" ng-show="myForm.zip.$dirty " ng-messages="myForm.zip.$error " role="alert "> <div ng-messages-include="pages/errors.html "></div> </div> </div> </div> <div class="form-group col-md-12 "> <label class="col-md-3 control-label ">Country</label> <div class="col-md-7 "> <input type="text " autocomplete="on " name="country " ng-model="$ctrl.contact.address.country " class="form-control input-sm " placeholder="Enter the country " ng-minlength="3 " /> <div class="has-error" ng-show="myForm.country.$dirty " ng-messages="myForm.country.$error " role="alert "> <div ng-messages-include="pages/errors.html "></div> </div> </div> </div> <div class="form-group col-md-12 "> <div class="text-center "> <button type="button " ng-click="$ctrl.submitAction() " class="btn btn-primary btn-sm " ng-disabled="myForm.$invalid ">Create</button> <button type="button " ng-click="$ctrl.resetAction() " class="btn btn-warning btn-sm ">Clear</button> </div> </div> </form> </div> </div> |
Some explanations on the html template.
- Layout helped with Bootstrap
Bootstrap provides many features to homogenize, simplify and make pretty the web pages. In this course, we could not explain in detail each Bootstrap features used. However at each time we will encounter a not yet studied feature, we will explain its goal.
– we use the Bootstrap panel and panel-primary classes :
<div class="panel panel-primary">.
The panel class applies some some basic border and padding in the contained elements in the root div of the template.
The panel-primary class decorates the panel class with the primary contextual state. But what is the primary contextual state ?
Bootstrap provides classes to decorate our html elements with common rendering needs (menu, panel, table, form, button, etc…) but it also provides contextual state classes to decorate them in a finer way.
Bootstrap defines the following contextual states : default, primary, success, info, warning and danger.
Each state is associated to a distinct color.
For example, the primary contextual state is associated to a dark blue color. That’s why in the above preview, the Contact Creation title is in a area with a dark blue background color.
– the form-group class is used to group elements of the form that are related :Its only purpose is to provide margin-bottom around a label and control pairing.<div class="form-group col-md-12"> <label class="col-md-3 control-label">Country</label> <div class="col-md-7"> <input type="text" autocomplete="on" name="country" ng-model="$ctrl.contact.address.country" class="form-control input-sm" placeholder="Enter the country" ng-minlength="3" /> <div class="has-error" ng-show="myForm.country.$dirty" ng-messages="myForm.country.$error" role="alert"> <div ng-messages-include="pages/errors.html"></div> </div> </div> </div>
– you have probably noticed that the html template doesn’t use any row class to display the elements (label + input) of the form. Instead of, we use the form-horizontal class that uses Bootstrap’s predefined grid classes to align labels and groups of form controls in a horizontal layout (which doesn’t have necessarily to be in a html form). Doing so changes the form-group class to behave as grid rows, so no need for row classes.
– the Boootstrap system grid requires to specify the class prefix : col-xs- , col-sm-, col-md- and col-lg- when you declare the number of cell occupied by a column.
These are their meanings :
col-xs- for extra small devices Phones (<768px)
col-sm- for small devices Tablets (≥768px)
col-md- for medium devices Desktops (≥992px)
col-lg- for large devices Desktops (≥1200px)
So we could apply a cell occupation that differs according to the width of the screen of the user device.
In this course, we don’t played with it. We only specify the col-md- prefix.
– Similarly to how we have decorated the panel heading, we decorate the Create and Clear buttons with Bootstrap button classes : btn btn-primary btn-sm for the Create button and btn btn-warning btn-sm for the Clear button.
btn-sm represents a small button (similarly to col-sm that represents a column for a small device).
btn-primary represents the primary contextual state applied to a button, similarly to panel-primary that represents the primary contextual state for a panel.
btn-warning refers to the warning contextual state applied to a button.
– we useclass="has-error"in the parent elements of elements containing error message for the user. The child elements have to own the control-label, form-control or help-block class for that has-error may be applied on.
The has-error class decorates the child elements with a light red color. The class should be applied when the validation state contains at least one error for the input.
We will see how we can use this class with angular form features.
By the way, Angular provides also a class to highlight inputs with validation errors : ng-invalid. But we will not use it because mixing CSS classes from Bootstrap and Angular could decrease the readability. - Data binding and form features with Angular
– we use the ngModel directive to bind form inputs to the contact object properties we have defined in the controller.
For example here :we bind the phone input to a phone property of the contact object stored in the controller ($ctrl.contact.phone).<input type="text" autocomplete="on" ng-minlength="8" ng-model="$ctrl.contact.phone" name="phone" class="form-control input-sm" placeholder="Enter Phone" />
– The form element declared in an angular template should not be considered as a plain html form.
Angular interprets the form element as a directive : the form directive.
Each form directive creates an instance of FormController that keeps track of all its controls and nested forms as well as the state of them, such as being valid/invalid or dirty/pristine. It provides multiple methods to query or change the form state.
To benefit from the FormController features, the forms and input fields with validation rules need to specify their name attribute, for example :<input type="text" name="phone" />.
For example in the following expressions using FormController features:formName.inputName.$dirtyandformName.inputName.$error,formNameis the name of the form element andinputName isthe name of the input element.
– ng-messages is a directive that is generally used to show an error message when the user input is not valid.
As it is practical for the user to have the error message just beside the input field, we put the ngMessages and the associated input field side by side:Generally we use ngMessages with the $error object associated to the html input element that stores a key/value state of validation errors.<div class="form-group col-md-12"> <label class="col-md-3 control-label">Phone</label> <div class="col-md-7"> <input type="text" autocomplete="on" ng-model="$ctrl.contact.phone" name="phone" class="form-control input-sm" placeholder="Enter Phone" ng-minlength="8" /> <div class="has-error" ng-show="myForm.phone.$dirty" ng-messages="myForm.phone.$error" role="alert"> <div ng-messages-include="pages/errors.html"></div> </div> </div> </div>
For example"myForm.phone.$error"may have one or multiple keys/values according to the validation roles of the input. In this case we have a single constraint :ng-minlength="8"but for the first name we have two constraints :required ng-minlength="2". That’s why<ng-messages for="expression" role="alert">may contain multiple
<ng-message when="stringValue">...</ng-message>elements.
In the contact creation form, some input fields have a minimum size, others are only mandatory and others may have a particular pattern (the email for example).
Besides, some rules are cumulative. Adding each needed<ng-message when="stringValue">...</ng-message>in each<ng-messages>seems a cumbersome way of handling it and of maintaining the validation rules of input values.
So, we favor the ngMessagesInclude directive that imports existing ngMessage template code from a specified resource and places the template of the resource into the exact spot that the ngMessagesInclude directive is placed within the ngMessages container. This allows for a series of pre-defined messages to be reused.
Here is the content of errors.html:– the user doesn’t need to submit the form to get a feedback on the inputs that contain errors. However we should not spot any error on an input before that the user starts to fill it. That’s why we use the ng-show directive.<div ng-message="required" class="control-label">This field is required</div> <div ng-message="minlength" class="control-label">This field is too short</div> <div ng-message="email" class="control-label">This field is not a valid email address</div>
For example to display the validation error on the lastName input only if the user has entered something in, we add this condition :ng-show="myForm.lastName.$dirty"in the div that contains the ng-messages directive.
– we define two buttons (one to submit the form, the other one to reset the form) associated to two distinct functions in the controller :We can see that none of these methods needs to have any parameter. The model is stored in the controller and the html input element is bound to the model. So the controller has all needed information to perform a form reset or a contact creation.<div class="text-center"> <button type="button" ng-click="$ctrl.submitAction()" class="btn btn-primary btn-sm" ng-disabled="myForm.$invalid">Create</button> <button type="button" ng-click="$ctrl.resetAction()" class="btn btn-warning btn-sm">Clear</button> </div>
Another interesting point is that the submit button is disabled while the form has at least one validation error by using the ng-disabled directive with as value the $invalid property of the form :ng-disabled="myForm.$invalid"
The html part of the component being explained, we will now study how the component and its controller are defined. Here is the contactCreation component declaration :
(function () { 'use strict'; //IIFE function ContactCreationController($scope, contactService) { var ctrl = this; ctrl.sexes = [{ value: 'MALE' }, { value: 'FEMALE' }, { value: 'UNKNOWN' }]; this.$onInit = function () { ctrl.contact = ctrl.createEmptyContact(); } ctrl.submitAction = function () { console.log('Saving New Contact', ctrl.contact); contactService.createContact(ctrl.contact) .then( function (newId) { ctrl.contact.id = newId; ctrl.onContactAdded({ createdContact: ctrl.contact }); ctrl.resetAction(); }, function (errResponse) { ctrl.onError({ msg: "Unexpected error. Thank you to contact us to get a issue solving." }) } ); } ctrl.resetAction = function () { ctrl.contact = ctrl.createEmptyContact(); $scope.myForm.$setPristine(); // reset Form } ctrl.createEmptyContact = function () { var contact = { id: null, firstName: '', lastName: '', birthday: null, email: '', phone: '', sex: '', address: { addressLine: '', city: '', zip: '', country: '', } } return contact; } }; angular.module('myContactApp') .component('contactCreation', { bindings: { onContactAdded: '&', onError: '&' }, templateUrl: 'components/createContact/contactCreation.html?' + new Date(), controller: ContactCreationController }) //END IIFE })(); |
Some explanations on the contactCreation component and its controller.
- A new property is used in the component declaration
Components have a well-defined public API for inputs and outputs.
An input is an information that comes from the parent component to it and an output is an information that comes from it to the parent component.
– Inputs should be using < and @ bindings. The < symbol denotes one-way bindings which are available since 1.5.
– Outputs are realized with & bindings, which function as callbacks to component events.
These are defined through the bindings property that contains as many properties as objects that could be passed to the component when it is instantiated. Any object type may be passed : string, number, custom object, function, etc…
For example, in the contactCreation component we declare the following bindings :
bindings: { onContactAdded: '&', onError: '&' }, |
Remember, contactCreationView is the parent component of contactCreation.
The parent component that handles notification messages to the user and potential communication with other components (we don’t have this case for the moment but it will soon arrive) needs to be informed of the outcomes of their children.
For now,contactCreationView wants to know when a contact was successful created in the contactCreation component but it also needs to know if an error is happened during the processing of the contactCreation Component.
To achieve it, contactCreation should invoke callbacks of contactCreationView.
We name onContactAdded the binding property for the callback when the contact was added.
We name onError, that has a more wide semantic, the binding property for the callback when an error occurs in the children component.
In the contactCreation component, the user can submit the form to create a contact only if the form validation passes. So, if he submits the form and that we have an error response from the backend, we can do nothing for him but displaying a general error message.
When we have unrecoverable errors, it is better to handle it in a generic way since in every cas, we don’t know how to handle it specifically. Increasing the number of methods in the parent and the child components to do the same generic handling should be avoided.
In the bindings property, the value associated to each binding name is the symbol that denotes the type of binding. We have explained them just above.
In the contactCreation component declaration we use & in the bindings values as the component needs to output towards its parent component : contactCreationView.
One of these two callbacks (onContactAdded and onError) are invoked in the submitAction() method of the controller according to the success or the failure of the contact creation :
ctrl.submitAction = function () { console.log('Saving New Contact', ctrl.contact); contactService.createContact(ctrl.contact) .then( function (newId) { ctrl.contact.id = newId; ctrl.onContactAdded({ createdContact: ctrl.contact }); ctrl.resetAction(); }, function (errResponse) { ctrl.onError({ msg: "Unexpected error. Thank you to contact us to get a issue solving." }) } ); } |
The contactCreation component reveals some core uses in Angular (components communication, invocation with callback notification, service dependency) but alone it cannot explain all.
You can consider onContactAdded() and onError() refer in a some way to the methods in the parent controller.
The binding between these local functions and the functions effectively called in the parent component is defined by the parent. We will see it soon.
Without getting into details of contactService that we deal with very soon, we can notice that the callback invocation to the parent component depends on another callback invocation : the first or the second defined function invoked in the then() method. It is a callback chaining. That is frequent enough with Angular.
- Injection of dependencies in the controller
So far we didn’t need to use dependency in the controllers we have declared. The first versions of our controllers performed very simple processings as adding a property with a literal value in the controller object. The this keyword was enough to address it.
Now things are different, we will use more intensively the controller but a controller should not try to do too much.
It should perform only the controller logic needed for the view, that is, performing the data binding, retrieving any data stored in its state and performing simple logic related to the view.
But it should delegate business logic and remote service invocation to dedicated services.
These services should be injected in the controller constructor function.
The constructor function can be also injected with special dependencies. $scope is for example one dependency specific to controllers.
Here is the ContactCreationController constructor function declaration where we inject two objects in :
function ContactCreateController($scope, contactService)
– we inject the $scope object in order to have access to the html form element to set it to its pristine state when we want to reset the form.
You can see it in the resetAction() method :
ctrl.resetAction = function () {
	ctrl.contact = ctrl.createEmptyContact();
	$scope.myForm.$setPristine();
} |
– we inject the contactService service because the controller relies on it to communicate with the backend.
- Using the lifecycle of the components
The $onInit() function is called on the controller after it has been constructed and had its bindings initialized. According to the Angular documentation , this is a good place to put initialization code for the controller.
We initialize here the contact property of the controller that is bound to the html from :
this.$onInit = function () { ctrl.contact = ctrl.createEmptyContact(); } |
Constant value and literal variable declarations should be very visible in a JavaScript file. So, we leave them (the sex enumeration in our case) at the top of the controller function. Declaring them non initialized at the top of the function and then give to them a value in $onInit() function creates a useless indirection.
- Defining the contact object bound to the html form
JavaScript is a dynamic language where properties of an object don’t need necessarily to be defined as the object is declared but it is a good principle to define them in a formal way before using it. It avoids searching how the object is used to understand how it is designed.
We instantiate the contact object in a method of the controller.
In this way, we could reuse it. Indeed, we need to have a object with default values when the component is loaded, when the user clicks on the reset button but also when a new contact was created.
ctrl.createEmptyContact = function () {

	var contact = {
		id: null,
		firstName: '',
		lastName: '',
                birthday: null,
		email: '',
                phone: '',
		sex: '',
		address: {
			addressLine: '',
			city: '',
			zip: '',
			country: '',
		}
	}
	return contact;
} |
Creating the contactService service to request the backend
As explained in injection of dependencies, you should use services to organize and share code across the application.
Angular services have two important particularities :
– these are lazily instantiated. Angular only instantiates a service when an application component depends on it.
– these are singletons. Each component dependent on a service gets a reference to the single instance generated by the service factory.
As a side effect of the second particularity :
– if your service is stateful and is reused in multiple views, you should take care about the state consistency of the service between the views.
– if your want to have a stateful service used in multiple views and you don’t want to share the same instance of the service in, you should offer a service that allows to create new instances of objects providing what the stateful service should provide : the required behaviors and its own state. We will see how to do it in the next iteration.
Angular offers a important number of useful services (like $http that we will use to request the backend), but for most applications you’ll also have to create your own if you want to have a clean code with components that don’t mix too many responsibilities.
You can also note that like other core Angular identifiers, built-in services always start with $ (for example $httpBackend, $interval or $http).
As part of the contact application, we will develop mainly services to communicate with the backend. Logic services are not required as the application doesn’t perform significant logic.
Here is the declaration of contactService.js :
(function () { 'use strict'; //IIFE angular.module('myContactApp') .factory('contactService', ContactService); function ContactService($http, $q) { var url = 'api/contacts'; return { createContact: function (contact) { return $http.post(url, contact) .then( function (response) { var newId = MyNgUtil.getIdentifierFromHeaderLocation(response); return newId; }, function (errResponse) { var errorReason = "the contact creation has encountered an error from the server side"; console.error(errorReason); return $q.reject(errorReason); } ); } } } //END IIFE })(); |
Some remarks on the contactService :
– We has previously studied the config() method of the module object to configure in the myContactApp module the states of the application.
Now, we use the factory() method of the module object to register a service in.
Developers can define their own services by registering the service’s name and the service factory function.
Below, in the myContactApp module, we register a service with the contactService name and the ContactService factory function, :
angular.module('myContactApp')
.factory('contactService', ContactService); |
– In the Angular philosophy the factory function is a object constructor. That’s why we always use it a uppercase as first letter in the factory function names.
– The contactService has for now one method : createContact() that takes as argument a contact. We will enrich this service when the other use cases will be implemented.
– The $http service is a core Angular service that facilitates the communication with the remote HTTP servers.
We can use the $http function that provides a general usage. It takes a single argument (a configuration object) which contains a large number of properties.
The most commonly used properties are the following :
– method – {string} – HTTP method (e.g. ‘GET’, ‘POST’, etc)
– url – {string|TrustedObject} – Absolute or relative URL of the resource that is being requested; or an object created by a call to $sce.trustAsResourceUrl(url).
– params – {Object.<string|Object>} – Map of strings or objects which will be serialized with the paramSerializer and appended as GET parameters.
– data – {string|Object} – Data to be sent as the request message data.
– headers – {Object} – Map of strings or functions which return strings representing HTTP headers to send to the server. If the return value of a function is null, the header will not be sent. Functions accept a config object as an argument.
Using the $http function may be cumbersome as it is very general.
So, we will use an alternative : the shortcut methods of the $http service.
All shortcut methods require passing in the URL, and request data must be passed in for POST/PUT requests. An optional config can be passed as the last argument.
In contactService we do : $http.post(url, contact) to send a POST request with as data a contact object to the url where url is a variable previously defined as 'api/contacts'.
Relative urls should be favored over absolute urls as they prevent from coupling the urls with a specific server and a specific port that may change according to the running environment.
The http methods of the $http service returns a promise object.
What is a promise object ?
The purpose of the promise object is to allow to perform an asynchronous task while getting access to the result of the deferred task when it completes.
In the case of the sending of a http request, it makes no sense to block the browser with a synchronous call or to force the caller that has sent the request to check periodically if the response was returned.
The promise object has 3 methods : then(), catch() and finally().
The then() method is enough in most of case because then() handles the two main scenarios. It takes as parameters 3 functions, which only the first one is mandatory.
Here is how the method may be used:
then(successCallback, [errorCallback], [notifyCallback])
The first one handles the successful case. It is unavoidable.
The second one handles the error cases. It is often very helpful.
The third one provides updates on the status of the promise’s execution. It might be helpful but it is generally much less used.
A response status code between 200 and 299 is considered a success status and will result in the success callback being called.
Any response status code outside of that range is considered an error status and will result in the error callback being called.
With these explanations, the way we use the then() method should be straight understandable :
return $http.post(url, contact) .then( function (response) { var newId = MyNgUtil.getIdentifierFromHeaderLocation(response); return newId; }, function (errResponse) { var errorReason = "the contact creation has encountered an error from the server side"; console.error(errorReason); return $q.reject(errorReason); } ); |
What do we perform in the successful case?
In the server side when the contact was created (in REST terms we say the resource was created), in the http response returned by the backend, it is a good practice to include a Location header that has as value an URL allowing to request the new resource.
In our case, the location value should be : api/contacts/{id} where {id} is the identifier of the contact.
Providing this information offers two great advantages :
– it allows the backend client to discover dynamically new resources by starting from a initial request.
– it allows the client application to get the identifier and update the added contact with this new information. If the client application needs to display this information, to modify or to delete the added contact, it has the required information without performing any new call to the backend.
We can retrieve the generated identifier from the http response by performing an easy manipulation on the String contained in the Location header .
This need is valid for any service that creates resources by requesting a rest backend.
So it seems more relevant to put it in a util function that we call getIdentifierFromHeaderLocation() and that takes as parameter a http response.
Here is the code of the util function :
getIdentifierFromUrl: function (url) { var lastIndexOfSlash = url.lastIndexOf("/"); var newId = url.substring(lastIndexOfSlash+1); return newId; }, getIdentifierFromHeaderLocation: function (response) { var location = response.headers('Location'); return this.getIdentifierFromUrl(location); }, |
You notice that we have split the processing in two functions : the one calling the other one. In the current part, it doesn’t change anything but when we will record the mock behavior for the delete request, you will understand why.
What do we perform in the error case?
The $http API is based on the deferred/promise APIs exposed by the $q service.
For simple usage patterns this doesn’t matter much and the single important thing that you should know is how to use the $q service to reject a promise.
When you receive a successful response from the server, you need to do nothing because values returned from both success and failure functions are not resolved as rejected values for the promise.
However when you receive a error response from the server, you want to reject the promise in order that the caller of the service be aware that the processing has failed.
To achieve it we call the $q.reject() method with as parameter the reason (it is generally a String but not necessarily). The reject() method returns a new promise that is resolved as rejected with the specified reason.
That’s why we write this code :
var errorReason = "the contact creation has encountered an error from the server side"; return $q.reject(errorReason); |
to return a rejected promise that allows the caller to see invoked the error callback function :
contactService.createContact(ctrl.contact) .then( function (newId) { ctrl.contact.id = newId; ctrl.onContactAdded({ createdContact: ctrl.contact }); ctrl.resetAction(); }, function (errResponse) { ctrl.onError({ msg: "Unexpected error. Thank you to contact us to get a issue solving." }) } ); |
Updating the view parent component (contactCreationView) to add the child component (contactCreation)
- The html template
As previously, we will study first the html template, then the controller.
Here is the contactCreationView.html template updated to handle the contact creation use case :
<div class="row"> <div class="col-md-6"> <div ng-show="$ctrl.currentSuccessMsg" class="alert alert-success"> <strong>Success! </strong>{{$ctrl.currentSuccessMsg}} </div> <div ng-show="$ctrl.currentErrorMsg" class="alert alert-danger"> <strong>Warn! </strong>{{$ctrl.currentErrorMsg}} </div> </div> </div> <div class="row"> <div class="col-md-6"> <contact-creation on-contact-added="$ctrl.contactAdded(createdContact)" on-error="$ctrl.displayErrorMsg(msg)"> </contact-creation> </div> </div> |
– we define two rows in the view : the first one displays the notification messages and the the second one contains the contactCreation component we have just implemented.
– In each column of each row we use only the half of the space available for the grid by declaring : class="col-md-6" in each div contains a data
column. For a medium device Desktop (≥992px), the half of the screen should be enough to display the contact creation form.
– The display of notification messages should be performed only if the controller of the view have a message to display.
So we have defined two properties in the controller to have this information : currentSuccessMsg and currentErrorMsg.
The rendering condition are ng-show="$ctrl.currentSuccessMsg" for the success message and ng-show="$ctrl.currentErrorMsg" for the error message. The property value has to be both a not null object and a not empty string so that ng-show shows the div.
<div ng-show="$ctrl.currentSuccessMsg" class="alert alert-success"> <strong>Success! </strong>{{$ctrl.currentSuccessMsg}} </div> <div ng-show="$ctrl.currentErrorMsg" class="alert alert-danger"> <strong>Warn! </strong>{{$ctrl.currentErrorMsg}} </div> |
– The adding of the contactCreation component is rather straight.
<contact-creation ... > </contact-creation> |
– With angular a component is not declared and referenced in the same way in the script side (controller, component declaration) and in the DOM side.
We have named contactCreation the component when we have registered it in the module :
angular.module('myContactApp') .component('contactCreation', ...{ |
but we have declared it contact-creation in the template :
<contact-creation></contact-creation> |
It is an Angular constraint. Angular normalizes an element’s tag and attribute name to determine which elements match which directives and components. We typically refer to directives and components by their case-sensitive camelCase normalized name (e.g. contactCreation). However, we have to refer to directives and components in the DOM by lower-case forms, typically using dash-delimited attributes on DOM elements (e.g. contact-creation).
– In the contactCreation component declaration, we had defined two output bindings (onContactAdded and onError) that we had used to invoke callbacks to the parent component according to the result of the contact creation user request.
Now, we can see how we bind these properties to methods of the contactCreationView controller :
<contact-creation on-contact-added="$ctrl.contactAdded(createdContact)" on-error="$ctrl.displayErrorMsg(msg)"> </contact-creation>
Concretely on-contact-added="$ctrl.contactAdded(createdContact)" provides to the contactCreation component a way to invoke the contactAdded() method of the contactCreationView controller when contactCreation invokes the on-contact-added method.
The method expects as parameter an object containing a createdContact property.
It is at this place where we define the properties that may transit as arguments during the invocation.
That means that if the contactCreation component want to invoke the callback with a contact parameter, it should provide as argument an object that owns a createdContact property.
Otherwise the parameter value would be recognized as undefined by the parent method callback.
The on-error="$ctrl.displayErrorMsg(msg)" binding declaration follows exactly the same mechanism.
- The component (script side)
Here is contactCreationView.js :
(function () { 'use strict'; //IIFE function ContactCreationViewController() { var ctrl = this; ctrl.currentErrorMsg = ""; ctrl.currentSuccessMsg = ""; ctrl.contactAdded = function (createdContact) { ctrl.displaySuccessMsg("Contact with id " + createdContact.id + " added."); } this.hideAllMsg = function () { this.currentSuccessMsg = ""; this.currentErrorMsg = ""; } ctrl.displaySuccessMsg = function (msg) { this.hideAllMsg(); this.currentSuccessMsg = msg; } ctrl.displayErrorMsg = function (msg) { this.hideAllMsg(); this.currentErrorMsg = msg; } } angular.module('myContactApp').component('contactCreationView', { templateUrl: 'components/createContact/contactCreationView.html?' + new Date(), controller: ContactCreationViewController }); //END IIFE })(); |
With what we have explained in the contactCreationView html template, we have not many things to add.
– We have indeed defined the currentSuccessMsg and currentErrorMsg properties in the controller to handle the user notifications.
– The contactAdded(createdContact) and displayErrorMsg(msg) declared as binding values for contactCreation in contactCreationView.html are indeed methods present in the parent component controller.
The components to implement the contact creation use case are finished. We get close to finish this part. We will add the mock behavior for the post request we perform in the contactService.
Mocking the POST HTTP request that creates a contact
In the part 3, we have configured and tested the mocked backend. Now, we will really use it. Here is the new version of mockServices.js :
(function () { 'use strict'; //IIFE var regexMock = new RegExp("/\?.+mock"); if (!document.URL.match(regexMock)) { return; } var myAppDev = angular.module('myContactApp') .config(function ($provide) { $provide.decorator('$httpBackend', angular.mock.e2e.$httpBackendDecorator); }) .run(function ($httpBackend, $http) { console.info("mocked backend enabled"); // state var contacts = []; var nextContactId = contacts.length + 1; // behavior $httpBackend.whenGET(/\.html.*$/).passThrough(); // POST CONTACT $httpBackend.whenPOST("api/contacts") .respond(function (method, url, data, headers) { console.log("mocked response for POST contact with data " + data); var contact = angular.fromJson(data); contact.id = nextContactId; contacts.push(contact); var responseMockHeaders = { Location: 'api/contacts/' + contact.id }; nextContactId++; return [201, {}, responseMockHeaders]; }); }); // run end })(); //END IIFE |
– Maintaining the state of mocked operation
Mocking requests is useful but to get a application with a mocked backend that allows to chain the usecases and to check that the logic between the use cases is right, we need to maintain in the mockService a state that reflects the user operations.
For example in mocked mode, when a user creates a contact, the contact is of course not added in the backend system but if the user displays then the list of the contacts, one should see the new added contact.
We define two variables to persist the state in the run() method :
// state var contacts = []; var nextContactId = contacts.length + 1; |
The contacts array contains contacts that are loaded at startup and then those that was created with the mock backend.
Generally, the identifiers of resources don’t start to 0 but to 1. Whereas the assignation
var nextContactId = contacts.length + 1;.
– Returning a http mocked response the most closest possible from the original.
Here, we mock the POST response to the request performed by contactService to create a contact:
// POST CONTACT $httpBackend.whenPOST("api/contacts") .respond(function (method, url, data, headers) { console.log("mocked response for POST contact with data " + data); var contact = angular.fromJson(data); contact.id = nextContactId; contacts.push(contact); var responseMockHeaders = { Location: 'api/contacts/' + contact.id }; nextContactId++; return [201, {}, responseMockHeaders]; }); |
The data parameter contains the data sent in the request : the contact.
We use the contact object (the posted data) to maintain the state and the consistency between the calls of the mocked backend. Here, data is in a JSON format.
We use angular.fromJson(data) to deserialize it to a plain JavasScript contact object.
Then we update the contact object by setting to it the next contact identifier, we add it in the contacts array and we increment the next contact identifier for the next created contact.
At last, we return the mocked response with a successful code (201 – created) and a header Location that contains the expected value : the resource url to request the new created contact.
When we mock a http request, it is very important to guarantee that the response be the more close possible to the actual response of the backend. Otherwise, we risk to have side effect and to have not repeatable behaviors between non mocked backend and mocked backend that may let think that we have some issues to solve in the application while the problem may be simply a mocking behavior with some lacks or that performs more things as the actual backend.
Updating app.js and index.html with new required dependencies and new created resources
– You have to create the my-util.js script that contains the utility function to retrieve the identifier from the Location header :
// util functions var MyNgUtil = (function () { return { getIdentifierFromUrl: function (url) { var lastIndexOfSlash = url.lastIndexOf("/"); var newId = url.substring(lastIndexOfSlash + 1); return newId; }, getIdentifierFromHeaderLocation: function (response) { var location = response.headers('Location'); return this.getIdentifierFromUrl(location); }, } }()) |
You can refer to the target source code layout to check all is suitably placed.
– You have to add the ‘ngMessages’ dependency in the module constructor as it is not included in angular.js library but it comes from angular-messages.js library.
Here is the update app.js file :
(function () { 'use strict'; //IIFE angular.module('myContactApp', ['ui.router', 'ngMessages']) .config(function ($stateProvider, $urlRouterProvider) { var states = [ { name: 'manageContacts', url: '/manageContacts', component: 'contactsManagementView' }, { name: 'createContacts', url: '/createContacts', component: 'contactCreationView' } ]; states.forEach(function (state) { $stateProvider.state(state); }); $urlRouterProvider.otherwise('/manageContacts'); }) // END IIFE })(); |
– You have to add in the index.html the new resources : contactCreation.js, contactService.js and my-util.js.
Here is updated index.html file :
<!DOCTYPE html> <html ng-app="myContactApp"> <head> <title>Contacts and Groups Management (Angular JS)</title> <style> </style> <!-- JQUERY --> <script src="lib-js/jquery-2.2.3.js"></script> <!-- bootstrap JS v3.3.6 --> <script src="lib-js/bootstrap.js"></script> <!-- bootstrap CSS v3.3.6 > --> <link rel="stylesheet" type="text/css" href="css/bootstrap.css"> <!-- angular lib --> <script src="https://ajax.googleapis.com/ajax/libs/angularjs/1.5.5/angular.js"></script> <script src="https://ajax.googleapis.com/ajax/libs/angularjs/1.5.5/angular-messages.js"></script> <script src="https://ajax.googleapis.com/ajax/libs/angularjs/1.5.5/angular-mocks.js"></script> <!-- angular extension lib --> <script src="lib-js/angular-ui-router.js"></script> <!-- app --> <link rel="stylesheet" type="text/css" href="app.css"> <script src="app.js"></script> <!-- native types enhancing and utility functions --> <script src="util/my-util.js"></script> <!-- services --> <script src="services/contactService.js"></script> <!-- mock services --> ${mockServices} <!-- contact management components --> <script src="components/manageContacts/contactsManagementView.js"></script> <!-- contact creation components --> <script src="components/createContact/contactCreationView.js"></script> <script src="components/createContact/contactCreation.js"></script> </head> <body> <div class="container-fluid"> <div class="row"> <div class="col-md-2 border1PxWithNoPadding"> <ul class="nav nav-pills nav-stacked"> <li ui-sref-active="active"><a ui-sref="manageContacts">Manage existing contacts</a></li> <li ui-sref-active="active"><a ui-sref="createContacts">Create a new contact</a></li> </ul> </div> <div class="col-md-10"> <ui-view></ui-view> </div> </div> </div> </body> </html> |
Running the application
As for the previous part, from the command line, under the contact-webapp directory, execute the mvn -Pdev command to include the mock facility to the application.
When the server is started, visit the web page with the mocking backend enabled by browsing : http://localhost:8095/contact-webapp/#/createContacts?mock
Downloading the source code
You can download the source code here :
[sdm_download id= »2304″ fancy= »1″]
Next part : Implementing client-side the contacts display (5/9)