
Go back to the table of contents for
Developing a Contact Management Application with Angular 1.5X and Java
We have implemented the contact creation use case in the previous part. Now we will implement a related use case: the display of contacts.
Here are the tasks to implement the contacts display use case from the client side :
- Preview of the content that we want to get
- Use case presentation
- Source code layout
- Creating the contactList component
- Creating the myAddress component
- Updating the contactService service to provide a method fetching all contacts
- Updating the view component (contactsManagementView) to add the child component (contactList)
- Mocking the GET HTTP request fetching all contacts
- Updating index.html with new created resources
- Running the application
- Downloading the source code
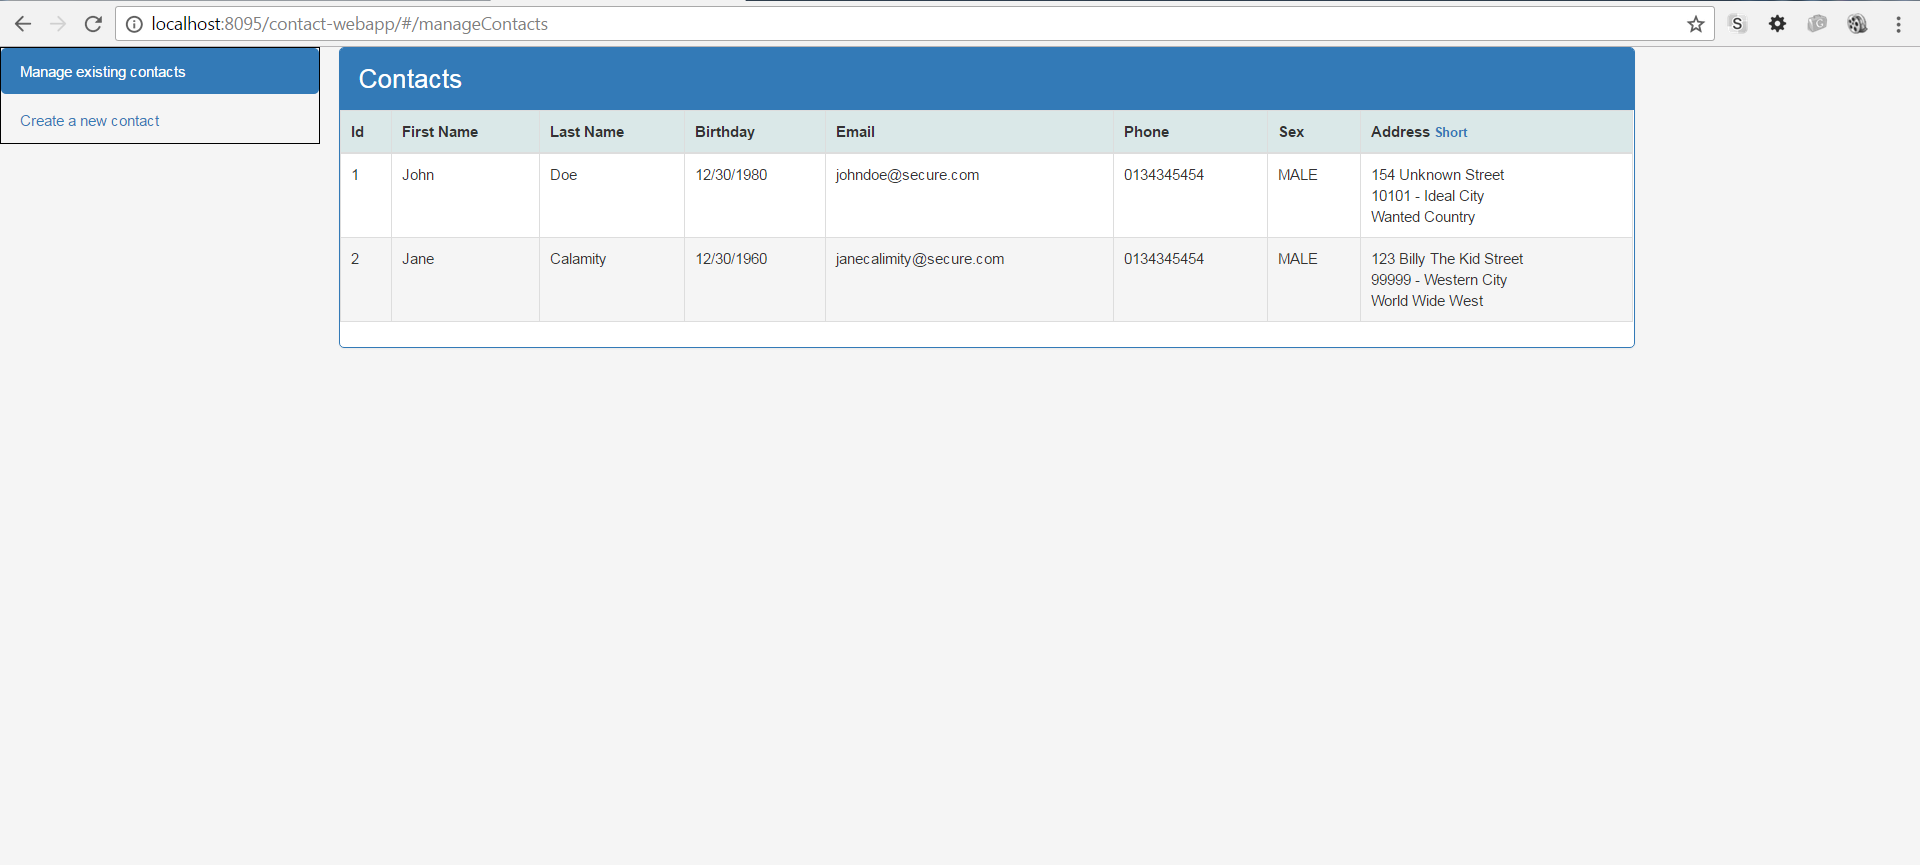
Preview of the content that we want to get
Use case presentation
The display of the contacts has to be rendered as soon as the page is displayed.
Each contact has to be represented on a distinct row.
Besides, the address is an information that demands a particular attention.
Indeed, displaying the address with a full postal format makes the address content responsible to have the columns height bigger. It may be undesirable if the user wants to display as many as possible rows on its screen without having to scroll.
So that the user may choose the address format, we will provide a link beside the address header column to switch from a full format to a short format. You can see it in the preview.
Source code layout
To have a view of the source code we will get at the end of this step you can refer to this :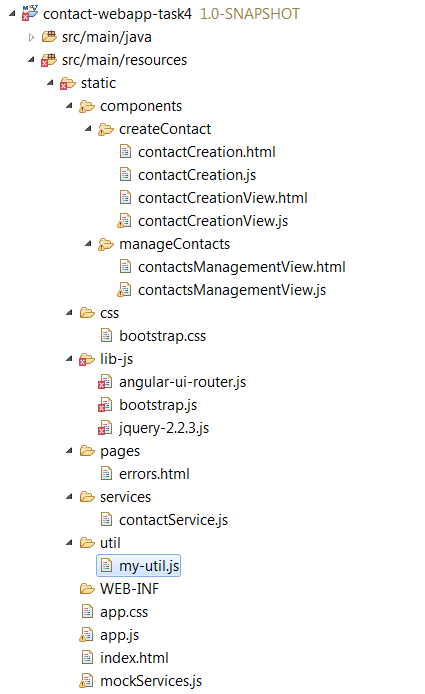
Creating the contactList component
As previously explained an angular component has always two sides : the controller and the template.
Here is the contactList.html template :
<div class="panel panel-primary"> <!-- heading --> <div class="panel-heading"> <span class="lead">Contacts</span> </div> <!-- body --> <div> <table class="table table-hover table-bordered"> <!-- <table>--> <thead class="main-background-color"> <tr> <th>Id</th> <th>First Name</th> <th>Last Name</th> <th>Birthday</th> <th style="word-wrap: break-word; ">Email</th> <th>Phone</th> <th>Sex</th> <th> <span>Address </span> <span ng-show="$ctrl.isShortAddressMode() "> <a style="font-size: 10px " ng-click="$ctrl.toggleAddressMode()"> Full</a> </span> <span ng-show="$ctrl.isFullAddressMode() "> <a style="font-size: 10px " ng-click="$ctrl.toggleAddressMode()">Short</a> </span> </th> </tr> </thead> <tbody> <tr ng-repeat="c in $ctrl.contacts "> <td>{{c.id}}</td> <td>{{c.firstName}}</td> <td>{{c.lastName}}</td> <td>{{c.birthday | date:'MM/dd/yyyy'}}</td> <td>{{c.email}}</td> <td>{{c.phone}}</td> <td>{{c.sex}}</td> <td> <my-address address="c.address " display-mode="$ctrl.addressMode"> </my-address> </td> </tr> </tbody> </table> <!-- </div>--> </div> </div> |
- Layout helped with Bootstrap
In the previous part, we have used the Bootstrap classes to get a good looking form rendering.
In this part, we will use another feature of Bootstrap : the classes to get a good looking tabular data rendering. It is the single significant new use of Bootstrap since the last step.
This feature is really powerful. By specifying only the table class in the table element declaration, we get a well-formatted table.
Besides we could overload this declaration with some classes that decorate in a finer way the table. For example with this simple declaration, the table is well formatted, the rows are highlighted on hover and the table has bordered corners :
<table class="table table-hover table-bordered"> ... </table> |
- Data array rendering features with Angular
– we use the ngRepeat directive to iterate the contacts that is an array property of the current controller.
ngRepeat instantiates a template once per item from a collection.
Each template instance gets its own scope, where the given loop variable is set to the current collection item, and $index is set to the item index or key.
Special properties are exposed on the local scope of each template instance but in our simple use case we don’t need to use them.
ngRepeat has multiple ways of being used. In our case we use the variable in expression syntax – where variable is the user defined loop variable and expression is a scope expression giving the collection to enumerate.
For example this instruction : ng-repeat="c in $ctrl.contacts" iterates over the contacts array property stored in the current controller and assigns during the loop the current retrieved object to the c variable.
Then we could use the c variable between the two tr elements to display each contact property in a distinct column of the table :
<tbody> <tr ng-repeat="c in $ctrl.contacts "> <td>{{c.id}}</td> <td>{{c.firstName}}</td> <td>{{c.lastName}}</td> <td>{{c.birthday | date:'MM/dd/yyyy'}}</td> <td>{{c.email}}</td> <td>{{c.phone}}</td> <td>{{c.sex}}</td> <td> <my-address address="c.address " display-mode="$ctrl.addressMode "> </my-address> </td> </tr> </tbody> |
- Angular filter to format a JavaScript date object
A filter formats the value of an expression. They can be used at many places: in view templates, controllers or services.
Angular comes with a collection of built-in filters as date, currency, number, lowercase, uppercase, etc… but it is easy to define your own as well.
The underlying API is the $filterProvider.
Filters can be applied to expressions in view templates using the following syntax:
{{ expression | filter }}
Filters can also be applied to the result of another filter. This is called « chaining ». It has the following syntax:
{{ expression | filter1 | filter2 | … }}
Here we use the built-in date filter to render the birthday date object to a string based on the requested date format (MM/dd/yyyy) :
<td>{{c.birthday | date:'MM/dd/yyyy'}}</td> |
- Custom component to represent the address
Inside contactList template, we declare my-address that is a custom child component as we don’t want the contactList component to own too many responsibilities.
As explained early, an address has multiple rendering formats. Besides in the future, we are not sure how the displayed format could evolve.
So it seems suitable to move the address in a dedicated component.
We can see that the my-address component accepts two attributes :
<my-address address="c.address " display-mode="$ctrl.addressMode"> |
In the previous part, we have discussed about the ways that the components have to communicate between them.
In the contact creation use case, the child component had needed to communicate the success or the failure of the contact creation.
It was an output communication, traditionally used for invoking a callback.
In the contact list use case, we are in a different scenario since it is the child component that needs to receive an information from this parent component.
It is an input communication, traditionally used for transmitting a configuration or a data parameter that the child component uses to initialize and update its state.
In our case, the address component needs to receive two information : address the address object to render and display-mode the formatting to use.
The first information is a the address property defined in the contact object on which we are currently iterating and the second information comes from the addressMode property declared in the current controller. We declare a default display mode inside.
- Using ng-click with an a html element
In the contact creation use case, we had used the ng-click directive with an input button to associate a button click to a controller method.
In the contact list use case, we use the same directive but this time on a html link :
<a style="font-size: 10px " ng-click="$ctrl.toggleAddressMode()"> Full</a> |
The html part of the component being explained, we will now study how the component and its controller are defined. Here is the contactList component declaration :
(function () { 'use strict'; //IIFE function ContactListController($scope, contactService) { var ctrl = this; ctrl.contacts = []; ctrl.addressMode = 'LONG'; this.$onInit = function () { ctrl.fetchAllContacts(); }; ctrl.fetchAllContacts = function () { contactService.fetchAllContacts() .then( function (contacts) { ctrl.contacts = contacts; }, function (errResponse) { ctrl.onError({ msg: "Unexpected error. Thank you to contact us to get a issue solving." }) } ); } /** user action */ ctrl.toggleAddressMode = function () { if (ctrl.addressMode == 'LONG') { ctrl.addressMode = 'SHORT'; } else { ctrl.addressMode = 'LONG'; } } ctrl.isShortAddressMode = function () { if (ctrl.addressMode == 'SHORT') { return true; } return false; } ctrl.isFullAddressMode = function () { return !ctrl.isShortAddressMode(); } } angular.module('myContactApp').component('contactList', { templateUrl: 'components/manageContacts/contactList.html?' + new Date(), controller: ContactListController, bindings: { onError: '&' } }); //END IIFE })(); |
- Retrieving all existing contacts from the contactService when the component is ready
We have added a new method in contactService to address this need. It is always safer to perform processings when the component is ready. So we perform it in the $onInit() method.
- Letting the view component (the parent) display an error message if we get a response error during the contacts loading
As for the contact creation use case, we have to alert the user as the remote service returns an error response :
function (errResponse) { ctrl.onError({ msg: "Unexpected error. Thank you to contact us to get a issue solving." }) } |
We can go to the next step : creating the myAddress component.
Creating the myAddress component
Why myAddress and not address ?
Contrary to the high level languages as Java or C#, in JavaScript objects are not defined in a namespace. To solve this lack we can use an object that is the root object containing our own objects used in the application.
Besides, CSS owns the namespace concept but unfortunately libraries including their own CSS (as Bootstrap for example) don’t systematically use the namespace as it makes the class using more verbose.
All this may create potential naming collisions.
In the present case, we cannot use address as component name as the Bootstrap CSS file declares the following CSS rule :
address { margin-bottom: 20px; font-style: normal; line-height: 1.42857143; } |
If we used address as component name and we declared the component as an element : <address>...</address> the component would be rendered but it would also apply the CSS rule above and it is not desirable because we don’t want necessarily to add a margin-bottom of 20 px.
So as a general rule we should favor the use of prefix for all our angular components if we want to avoid side-effects with third party CSS and JavaScript resources that we are using.
Declaring my-contact-app-contact-list is more verbose than contact-list. So, we may understand why the developers are reluctant to use systematically a prefix.
Here is the myAddress.html template :
<span ng-show="$ctrl.displayMode == 'LONG'"> {{$ctrl.address.addressLine}} <br/> {{$ctrl.address.zip}} - {{$ctrl.address.city}} <br/> {{$ctrl.address.country}} </span> <span ng-show="$ctrl.displayMode == 'SHORT'"> {{$ctrl.address.city}} / {{$ctrl.address.country}} </span> |
The component is very simple. It displays the address either with a short format or with a long format.
We can see that the display condition of the one or the other format is based on the $ctrl.displayMode property that we have set from the component template that declares a myAddress component instance:
<my-address address="c.address " display-mode="$ctrl.addressMode"> |
Here is the myAddress component and its controller declaration
(function () { 'use strict'; //IIFE function MyAddressController($scope, $window) { var ctrl = this; } angular.module('myContactApp').component('myAddress', { templateUrl: 'components/manageContacts/myAddress.html?' + new Date(), controller: MyAddressController, bindings: { address: '<', displayMode: '<' } }); //END IIFE })(); |
- Using the one-way binding to communicate from the my-address parent component to the my-address component
As discussed above, the address component needs to have an API that allows it to receive input information.
We have three types of input binding. From the least costly to the most costly in terms of performance:
– @ to bind a string if the value of the string doesn’t change.
– < to perform a one-way binding : from the parent to this (the child).
– : to perform a two-way binding : from the parent to this (the child) and reversely.
The < binding type has some specificities that we will detail when we would need to use them.
The idea is to always choose the less costly input binding type that meets the need.
For the actual case, we don’t bind a string that doesn’t change (displayMode is a string but it changes).
We don’t need either to have a double way binding because the child component(myAddress) doesn’t perform any change on the bound properties as it is a rendering component.
We just need to have a single way input communication from the parent to the child.
So the less costly binding input type that we can use for address and displayMode properties is a one-way binding :<.
bindings: { address: '<', displayMode: '<' } |
Updating the contactService service to provide a method fetching all contacts
Here is the new version of contactService :
(function () { 'use strict'; //IIFE angular.module('myContactApp') .factory('contactService', ContactService); function ContactService($http, $q) { var url = 'api/contacts'; return { createContact: function (contact) { return $http.post(url, contact) .then( function (response) { var newId = MyNgUtil.getIdentifierFromHeaderLocation(response); return newId; }, function (errResponse) { var errorReason = "the contact creation has encountered an error from the server side"; console.error(errorReason); return $q.reject(errorReason); } ); }, fetchAllContacts: function () { return $http.get(url) .then( function (response) { var contacts = response.data; // convert date in string type to a date type for (var i = 0; i < contacts.length; i++) { if (contacts[i].birthday) { contacts[i].birthday = new Date(contacts[i].birthday); } } return contacts; }, function (errResponse) { var errorReason = "the contacts fetching has encountered an error from the server side"; console.error(errorReason); return $q.reject(errorReason); } ); }, } } //END IIFE })(); |
The $http.get() method works in the same way that the $http.post() method we have explained in the previous part. It makes no sense to repeat the same thing. We will rather take interest in JSON data representing date information retrieved from the backend.
- Converting string values representing dates into JavaScript objects.
When we request the backend to retrieve all contact objects, we get a JSON array that contains contact objects which may contain the birthday property with a date information. But this date is not a JavaScript date because javaScript specifies a date type but JSON doesn’t.
So the birthday properties returned by the backend are String objects.
The String are formatted according to the JSON API and the used mapping configuration in the back end.
So from the caller side, we have to convert the date information represented as a String into a date object. Below is the code where we perform the conversion :
for (var i = 0; i < contacts.length; i++) { if (contacts[i].birthday) { contacts[i].birthday = new Date(contacts[i].birthday); } } |
Making at the hand the conversion from a String to a Date is not necessary a clumsy way of handling this concern while this manual conversion is not written multiple times.
If we had to deal with multiple methods that perform explicitly this conversion, it would become error-prone, especially as we add in the data model new properties representing date information.
In this case, we are encouraged to use the transforming responses feature provided by Angular that allows to add some hooks to manipulate the data returned from the http response before that the $http method invokes the callback.
In a very basic application as which one we are developing, we could solve the problem by simply writing the manual conversion in the layer service instead of doing it in the controller layer. Indeed as all controllers rely on the same service to request the data from the backend, the manual conversion task is written a single time.
We will finish the implementation of the contacts display use case from the client side by updating the contactsManagementView component.
Updating the view component (contactsManagementView) to add the child component (contactList)
The child component (contactList) of contactsManagementView has the same onError binding property as we have used in the contactCreation component. Don’t hesitate to refer to the previous part to understand the logic.
Here is the contactsManagementView.html template :
<div class="row"> <div class="col-md-10"> <div ng-show="$ctrl.currentSuccessMsg" class="alert alert-success"> <strong>Success! </strong>{{$ctrl.currentSuccessMsg}} </div> <div ng-show="$ctrl.currentErrorMsg" class="alert alert-danger"> <strong>Warn! </strong>{{$ctrl.currentErrorMsg}} </div> </div> </div> <div class="row"> <contact-list class="col-md-10" on-error="$ctrl.displayErrorMsg(msg)"> </contact-list> </div> |
Here is the contactsManagementView component and its controller declaration :
(function () { 'use strict'; //IIFE function ContactsManagementViewController() { var ctrl = this; ctrl.currentErrorMsg = ""; this.hideAllMsg = function () { this.currentErrorMsg = ""; } ctrl.displayErrorMsg = function (msg) { this.hideAllMsg(); this.currentErrorMsg = msg; } } angular.module('myContactApp').component('contactsManagementView', { templateUrl: 'components/manageContacts/contactsManagementView.html?' + new Date(), controller: ContactsManagementViewController }); //END IIFE })(); |
You can notice that between this use case and the previous one (the contact creation use case) we starts to repeat ourselves both in the children and the parent components to notify backend errors to parent components but also to render the message in the parent component.
It is not a desirable duplication. So, this issue will be addressed in a next part.
As a general rule, when a code duplication happens and that it is not desirable, it is always a good thing to see how we could remove it.
As part of the course, as soon as an undesirable code duplication happens, we will see how we can settle it.
Mocking the GET HTTP request fetching all contacts
In the previous part we have configured the mocked backend to mock responses for contact creation.
Now, we will return a mock response when we request the backend to fetch all existing contacts.
Here is the new version of mockServices.js :
(function () { 'use strict'; //IIFE var regexMock = new RegExp("/\?.+mock"); if (!document.URL.match(regexMock)) { return; } var myAppDev = angular.module('myContactApp') .config(function ($provide) { $provide.decorator('$httpBackend', angular.mock.e2e.$httpBackendDecorator); }) .run(function ($httpBackend, $http) { console.info("mocked backend enabled"); // state var contacts = [ { id: 1, firstName: 'John', lastName: 'Doe', birthday: null, email: 'johndoe@secure.com', phone: '0134345454', sex: 'MALE', address: { addressLine: '154 Unknown Street', city: 'Ideal City', zip: '10101', country: 'Wanted Country' } }, { id: 2, firstName: 'Jane', lastName: 'Calamity', birthday: new Date("1852-05-01"), email: 'janecalimity@secure.com', phone: '0134345454', sex: 'MALE', address: { addressLine: '123 Billy The Kid Street', city: 'Western City', zip: '99999', country: 'World Wide West' } } ]; var nextContactId = contacts.length + 1; // behavior $httpBackend.whenGET(/\.html.*$/).passThrough(); // GET CONTACTS $httpBackend.whenGET("api/contacts").respond(contacts); // POST CONTACT $httpBackend.whenPOST("api/contacts") .respond(function (method, url, data, headers) { console.log("mocked response for POST contact with data " + data); var contact = angular.fromJson(data); contact.id = nextContactId; contacts.push(contact); var responseMockHeaders = { Location: 'api/contacts/' + contact.id }; nextContactId++; return [201, {}, responseMockHeaders]; }); }); // run end })(); //END IIFE |
Here is the mocked response:
$httpBackend.whenGET("api/contacts").respond(contacts); |
The response returns simply the array of contacts stored in the mocked backend context.
In order to have something to display when we use the mocked backend, we have added in the setup of the mocked backend context two contact objects in the contacts array that was initialized to empty in the previous version of mockServices.js.
Updating index.html with new created resources
You have to add in the index.html the new resources : contactList.js and myAddress.js.
Here is the updated index.html file :
<!DOCTYPE html> <html ng-app="myContactApp"> <head> <title>Contacts and Groups Management (Angular JS)</title> <style> </style> <!-- JQUERY --> <script src="lib-js/jquery-2.2.3.js"></script> <!-- bootstrap JS v3.3.6 --> <script src="lib-js/bootstrap.js"></script> <!-- bootstrap CSS v3.3.6 > --> <link rel="stylesheet" type="text/css" href="css/bootstrap.css"> <!-- angular lib --> <script src="https://ajax.googleapis.com/ajax/libs/angularjs/1.5.5/angular.js"></script> <script src="https://ajax.googleapis.com/ajax/libs/angularjs/1.5.5/angular-messages.js"></script> <script src="https://ajax.googleapis.com/ajax/libs/angularjs/1.5.5/angular-mocks.js"></script> <!-- angular extension lib --> <script src="lib-js/angular-ui-router.js"></script> <!-- app --> <link rel="stylesheet" type="text/css" href="app.css"> <script src="app.js"></script> <!-- native types enhancing and utility functions --> <script src="util/my-util.js"></script> <!-- services --> <script src="services/contactService.js"></script> <!-- mock services --> ${mockServices} <!-- contact management components --> <script src="components/manageContacts/contactsManagementView.js"></script> <script src="components/manageContacts/contactList.js"></script> <script src="components/manageContacts/myAddress.js"></script> <!-- contact creation components --> <script src="components/createContact/contactCreationView.js"></script> <script src="components/createContact/contactCreation.js"></script> </head> <body> <div class="container-fluid"> <div class="row"> <div class="col-md-2 border1PxWithNoPadding"> <ul class="nav nav-pills nav-stacked"> <li ui-sref-active="active"><a ui-sref="manageContacts">Manage existing contacts</a></li> <li ui-sref-active="active"><a ui-sref="createContacts">Create a new contact</a></li> </ul> </div> <div class="col-md-10"> <ui-view></ui-view> </div> </div> </div> </body> </html> |
Running the application
As for the previous part, from the command line, under the contact-webapp directory, execute the mvn -Pdev command to include the mock facility to the application.
When the server is started, visit the web page with the mocking backend enabled by browsing : http://localhost:8095/contact-webapp/#/manageContacts?mock
Downloading the source code
You can download the source code here : [sdm_download id= »2368″ fancy= »1″]
Next part : Using JavaScript and Angular features to remove duplication for common needs in view components (6/9)